MuleSoft Technical Guides

GraphQL Integration With Mule 4


What is GraphQL?
GraphQL is a query language for APIs and a runtime for fulfilling those queries with your existing data. Created by Facebook, implemented in their mobile app in 2012 and open-sourced in 2015. It is rapidly becoming the standard for API-based data access. GraphQL provides a complete and understandable description of the data in your API, and provides responses according to the client requirements.
Why GraphQL?
- GraphQL queries always return predictable results. Apps using GraphQL are fast and stable because they control the data they get, not the server. It always sends the required response nothing more and nothing less.
- GraphQL queries access not just the properties of one resource but also smoothly follow references between them with the help of GraphQL field resolver. While typical REST APIs require loading from multiple URLs, GraphQL APIs get all the data your app needs in a single request. That’s why we only required one endpoint in GraphQL for all the queries.
Schema:
The GraphQL schema is at the center of every GraphQL server. It defines the server’s API, allowing clients to know which operations can be performed by the server. The schema is written using the GraphQL schema language (also called schema definition language, SDL). With it, you can define object types and fields to represent data that can be retrieved from the API.
Prerequisites:
- Anypoint Studio 7
- Postman
Steps before creating Mule Project :-
STEP 1: Go to https://github.com/mulesoft-labs/graphql-router
- Copy clone URL from github repository.
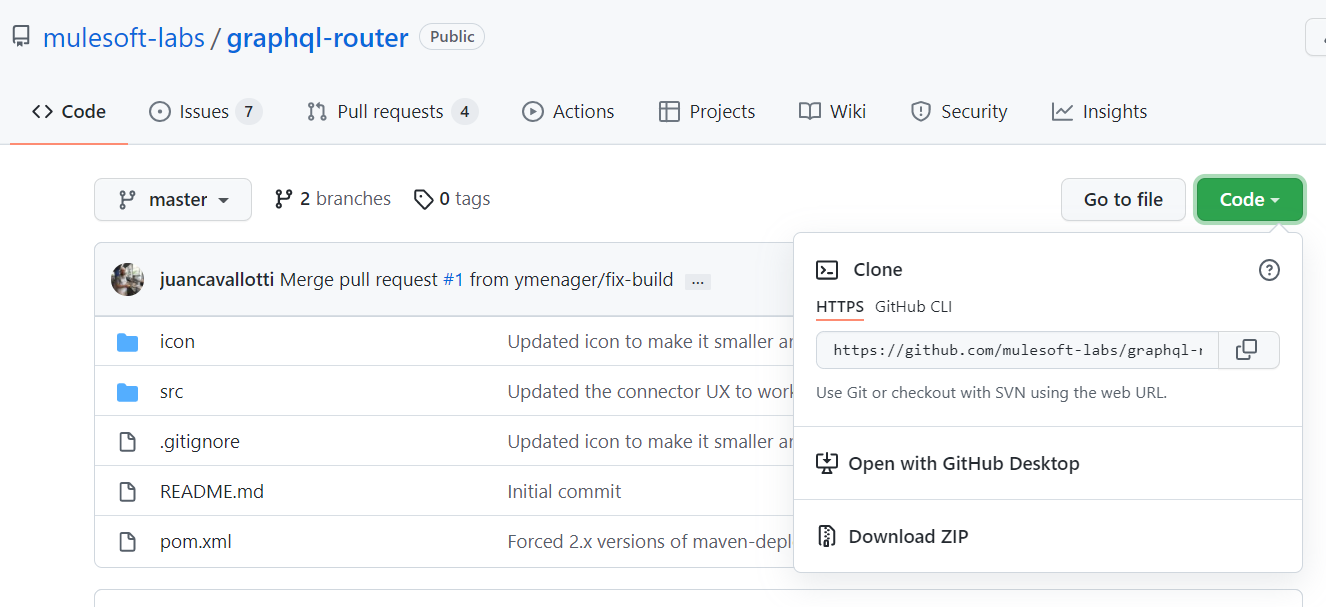
Step 2: Create a Folder in your local system: graphql-demo and then go to command prompt and type the following commands:
- cd graphql-demo(if you are not inside the folder directory).
- git clone https://github.com/mulesoft-labs/graphql-router.git
STEP 3: Once the project is cloned in your local system, go to pom.xml and change the mule-modules-parent version from 1.0.0 to 1.1.3.
For example:
<parent>
<groupId>org.mule.extensions</groupId>
<artifactId>mule-modules-parent</artifactId>
<version>1.1.3</version>
</parent>
STEP 4: Go the the location where project is cloned and then go to command prompt and run below mentioned command:
- mvn clean install
Once the project is built successfully, Let’s get started!
USE CASE 1
If a REST API has 30 fields and your client requires only 5 or 10 fields, GraphQL can extract only required fields out of those total fields.
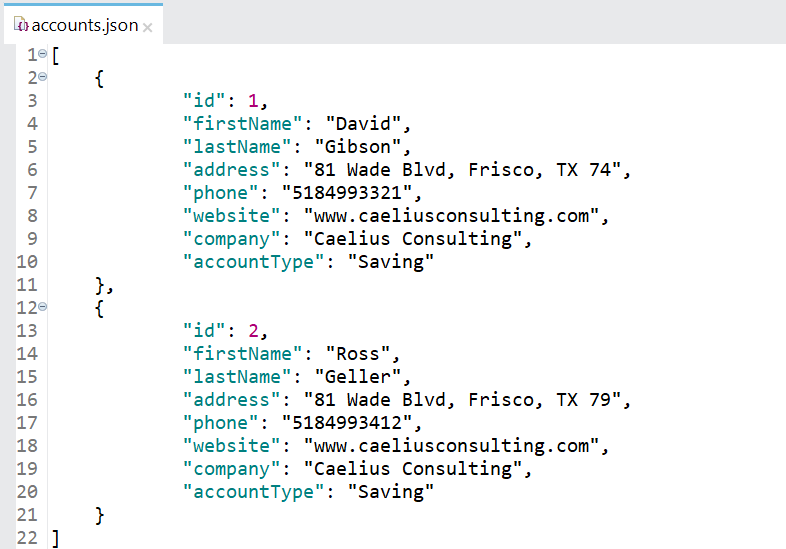
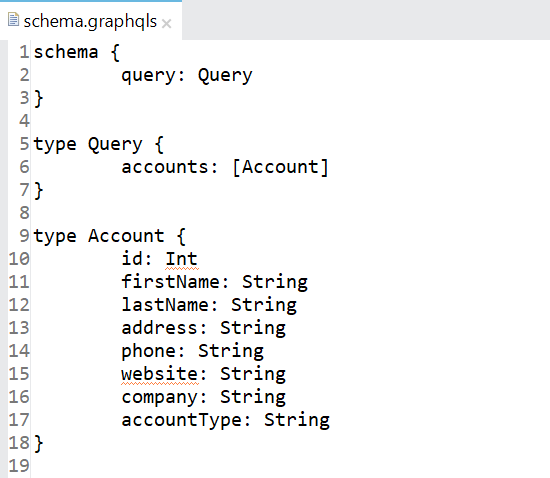
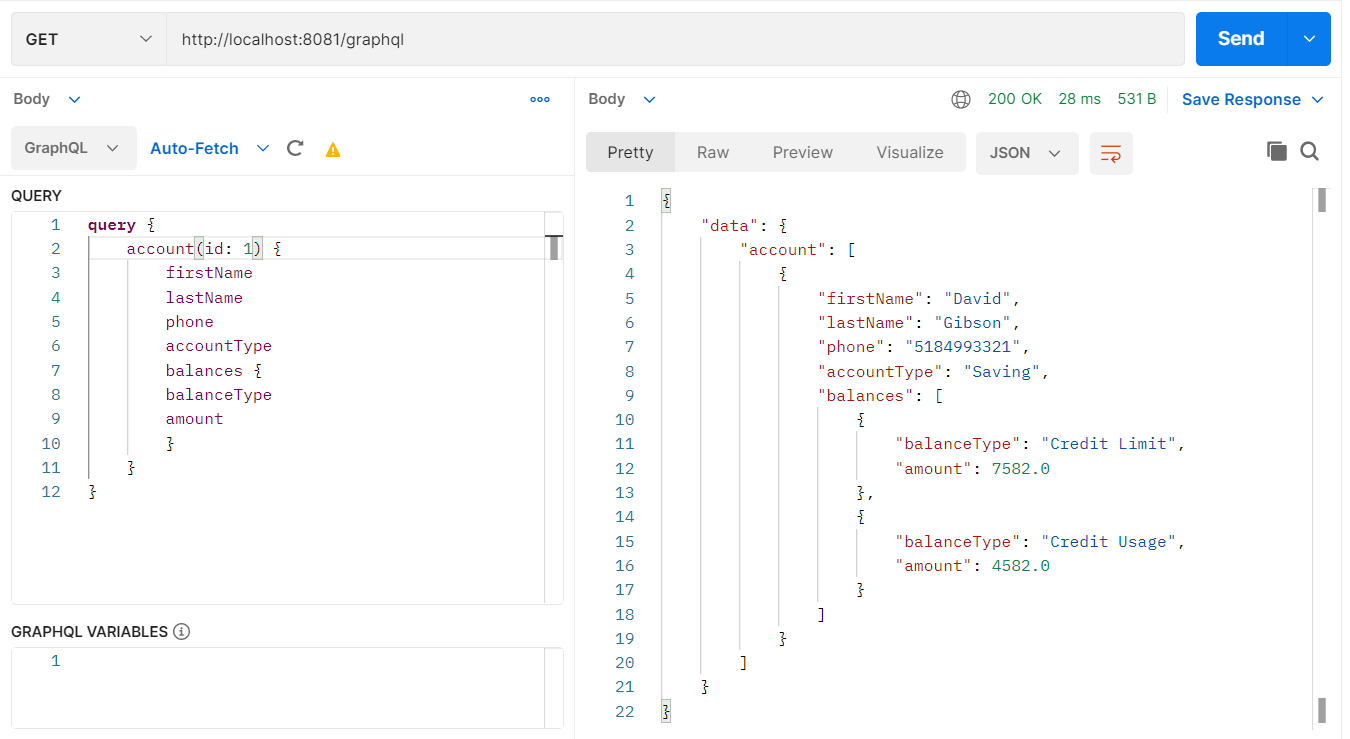
For eg: In this use case, we have Accounts REST API which has 8 fields.
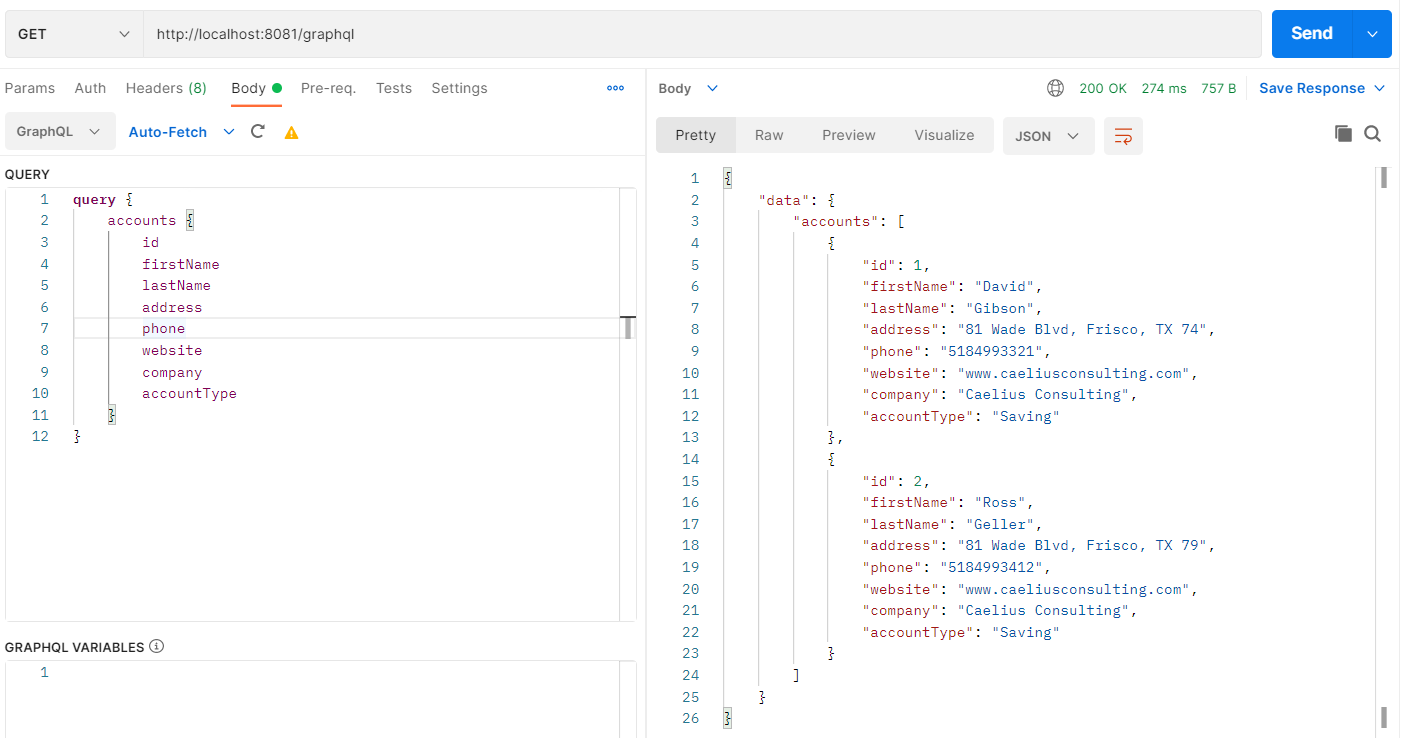
id, firstName, lastName, address, phone, website, company, accountType
So if Client 1 has requirements of only 2 fields and Client 2 has requirements of all fields (as shown in Postman example) then with REST API architecture we need 2 endpoints or we can use a choice router according to the requirement, but those changes will be at the code level. Later if the requirement changes entire code has to be changed but with graphql these changes don’t require any code-level changes.
Steps after setup graphQL:-
STEP 1: Create sample Mule project in Anypoint Studio.
STEP 2: Add following dependency in pom.xml.
<dependency>
  <groupId>com.mulesoft.services</groupId>
  <artifactId>mule-module-graphql</artifactId>
  <version>1.0.0-SNAPSHOT</version>
  <classifier>mule-plugin</classifier>
</dependency>
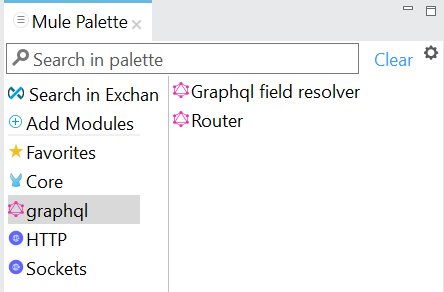
- After adding this dependency graphQL module will be visible under Mule Palette.
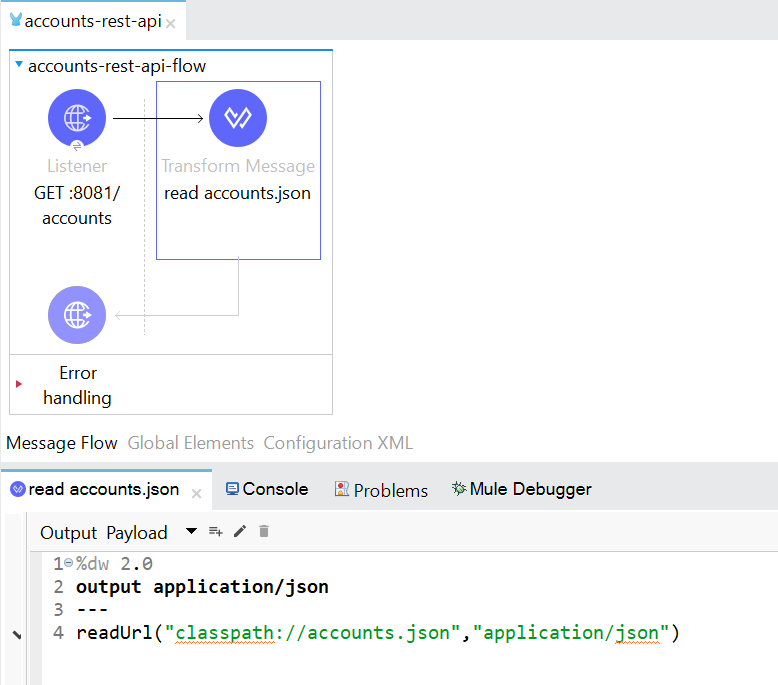
STEP 3: Add accounts.json file under src/main/resources.
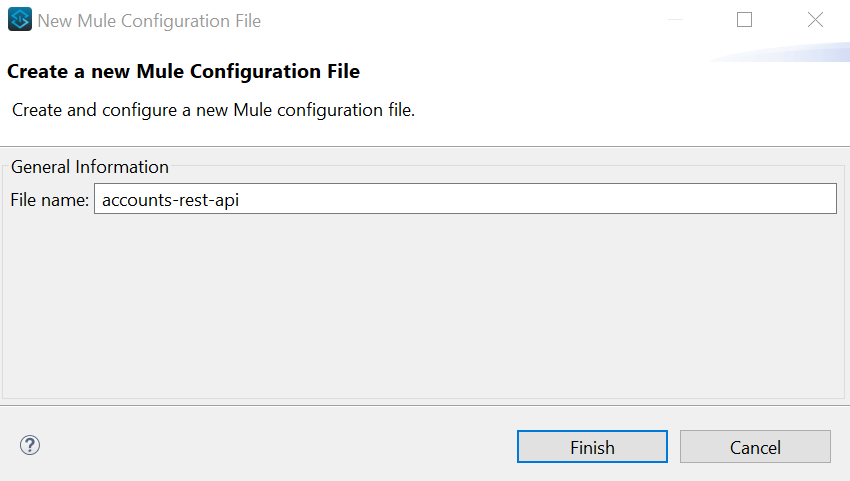
- Create a mule file for accounts. Right click on src/main/mule and then select New -> Mule Configuration File.
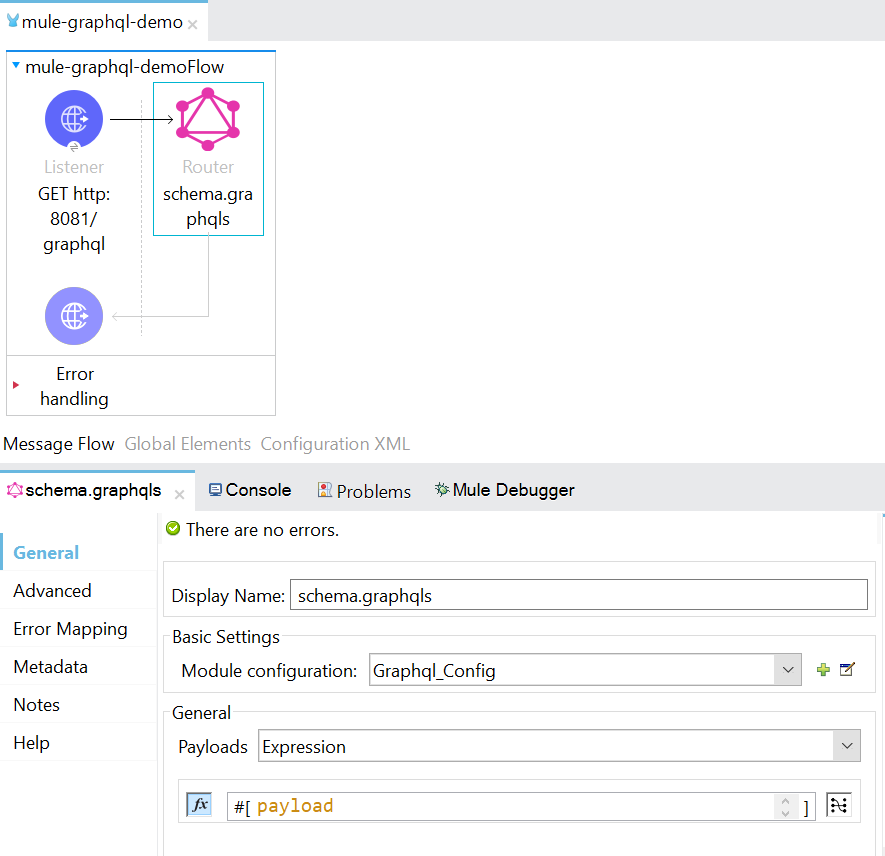
STEP 4: Create a flow as shown below.
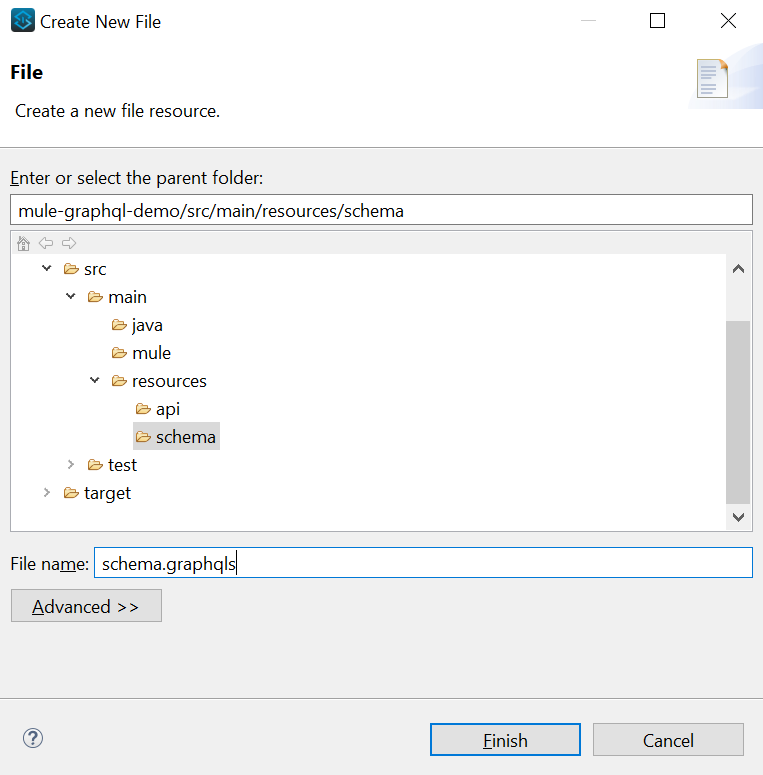
STEP 5: Right click on src/main/resources and then select New -> Folder give Folder Name as schema.
- Right click on schema Folder under src/main/resources/schema -> New-> File.
- Create Graphql schema as shown below:
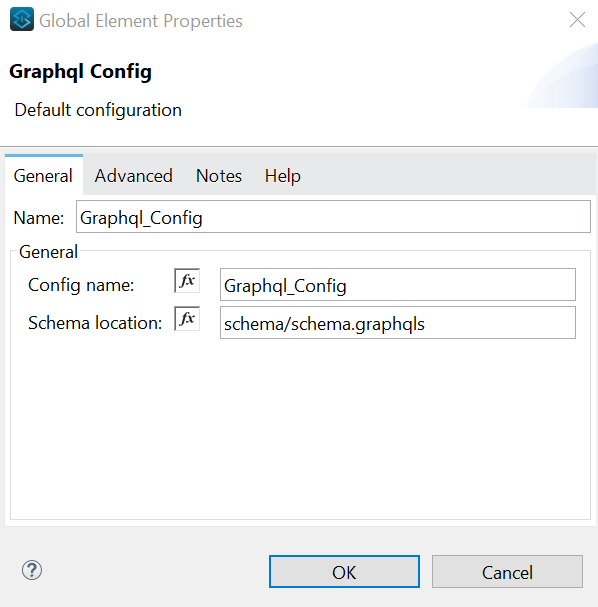
- Configure GraphQL config
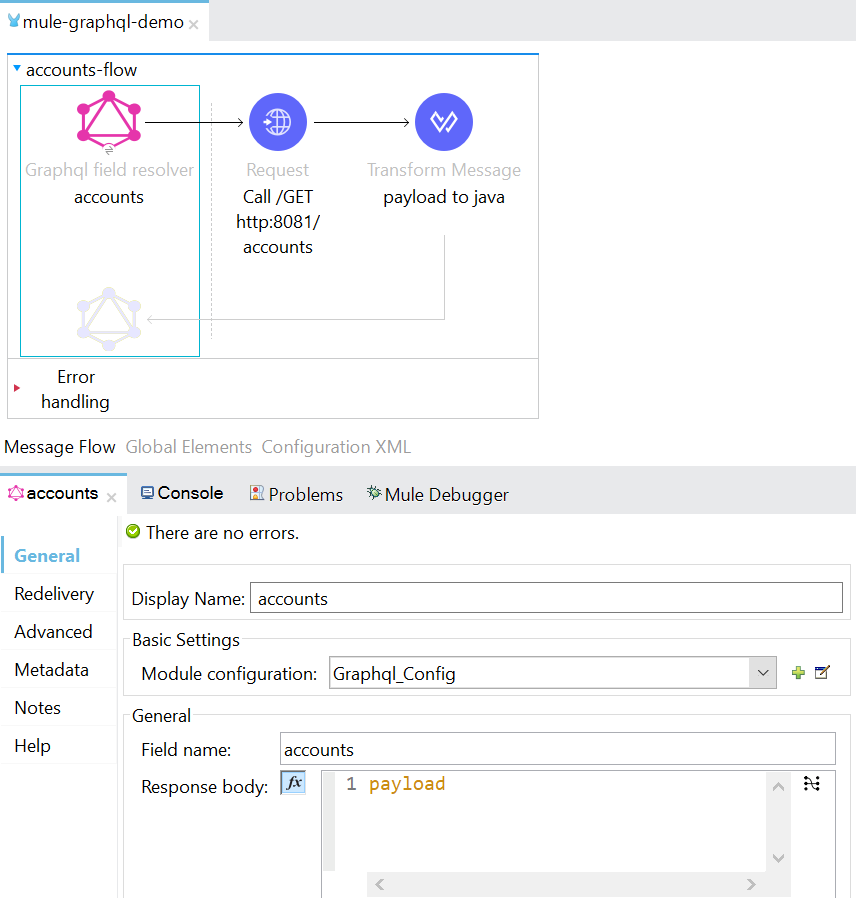
STEP 6: Create flow as shown below:
- Graphql field resolver flow-config:
In GraphField Resolver give Field Name as accounts
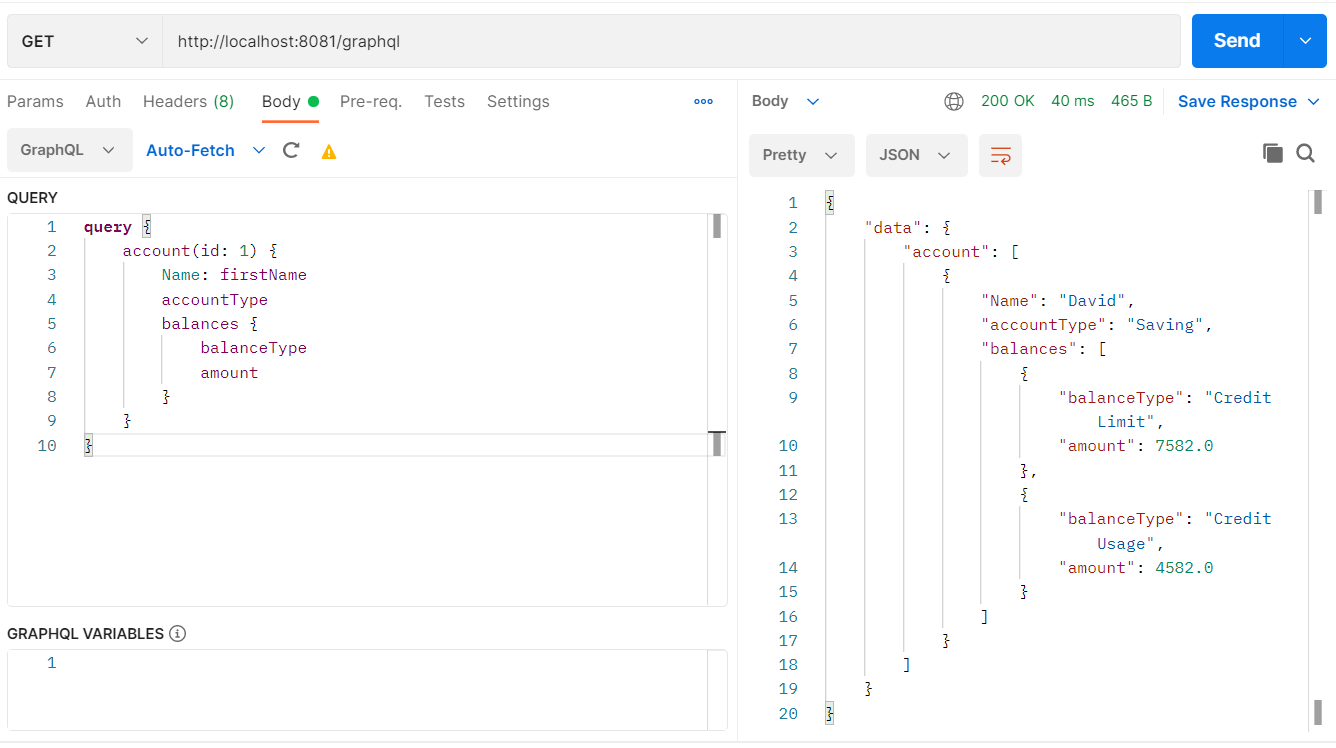
STEP 7: Hit graphql endpoint from postman and keep changing the fields according to requirement.
- Select body -> GraphQL.

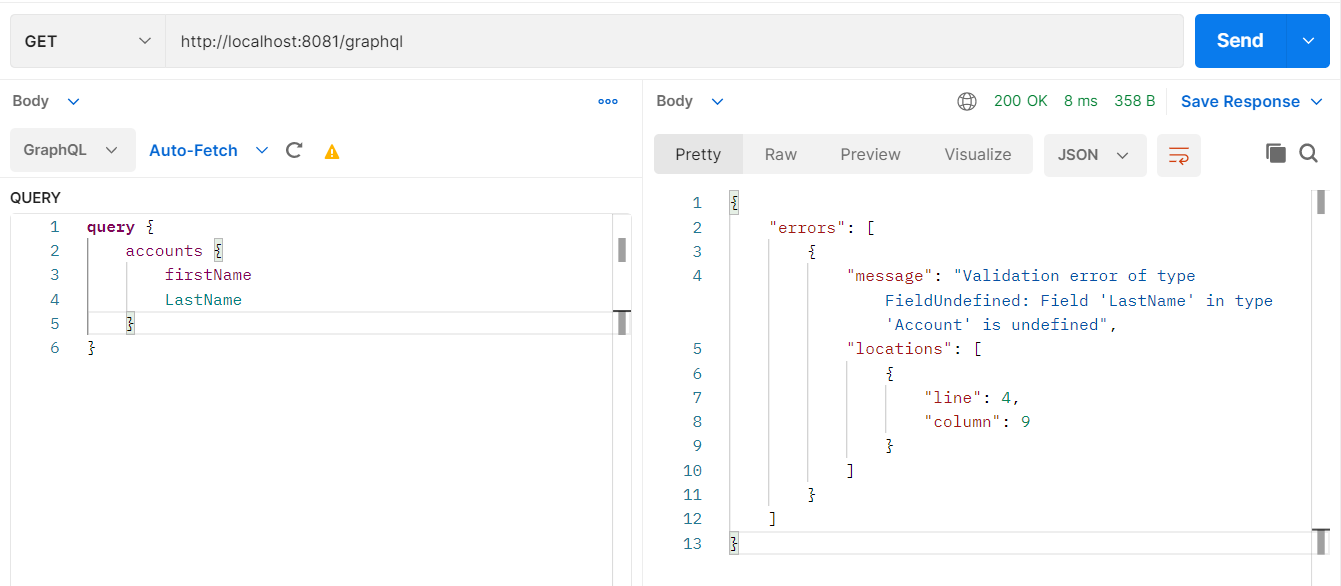
- Error Scenario: In this we have passed the wrong field name i.e, LastName.
USE CASE 2
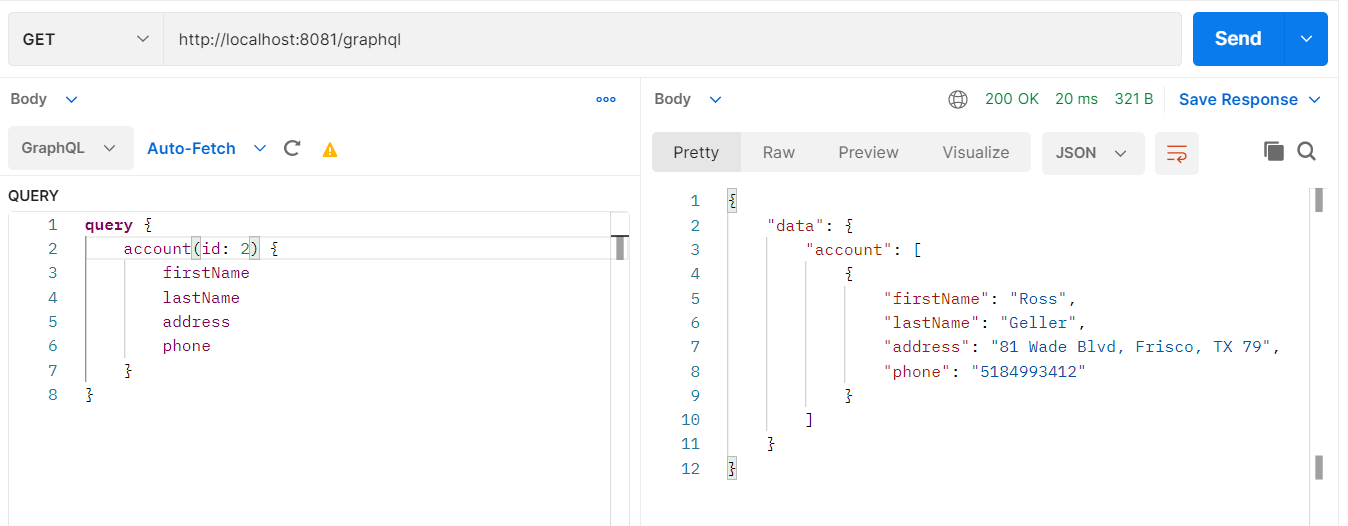
In this use case, if a client wants to fetch the different fields of an account by providing accountId then we need different endpoints for all the requirements or we have to use a choice router according to the requirement but for GraphQL we only require one endpoint for all the different requirements.
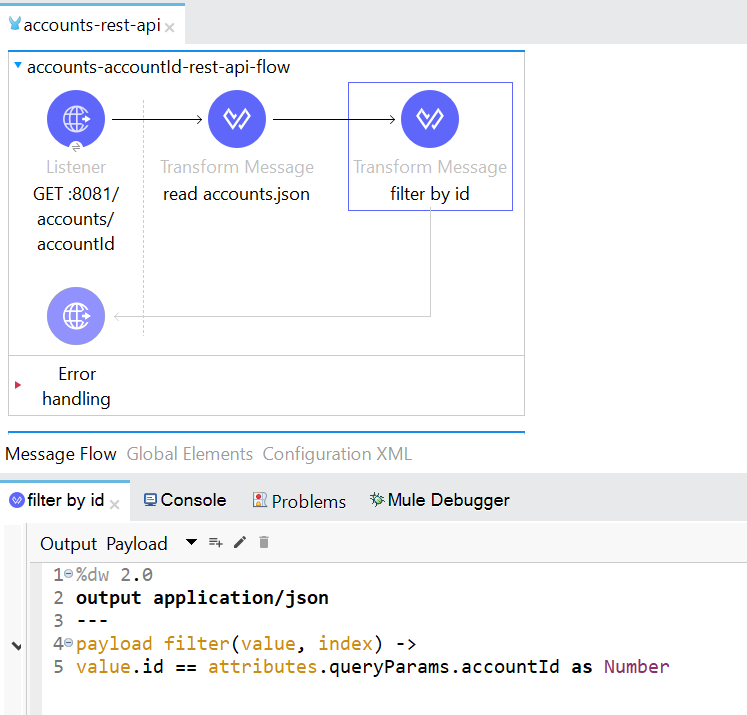
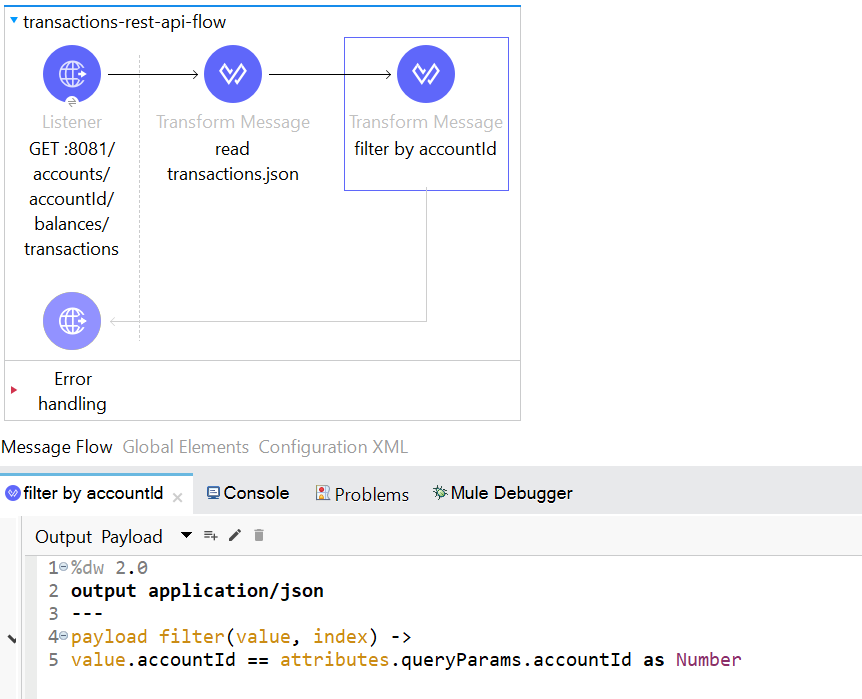
STEP 8: Create flow as shown below and Read accounts.json file using Transform Message as readUrl(“classpath://accounts.json”,“application/json”) and filter the data by id attribute.
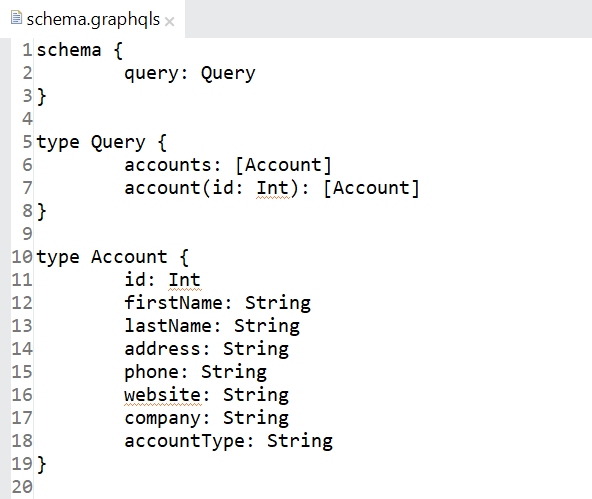
STEP 9: Edit the schema.graphqls file.
STEP 10: Graphql field resolver flow-config:
In GraphField Resolver gives Field Name as account.

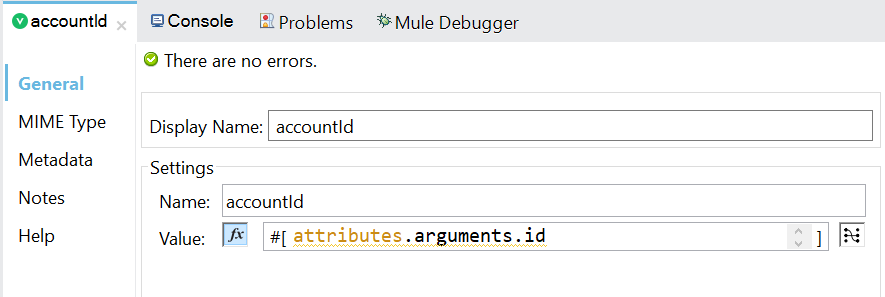
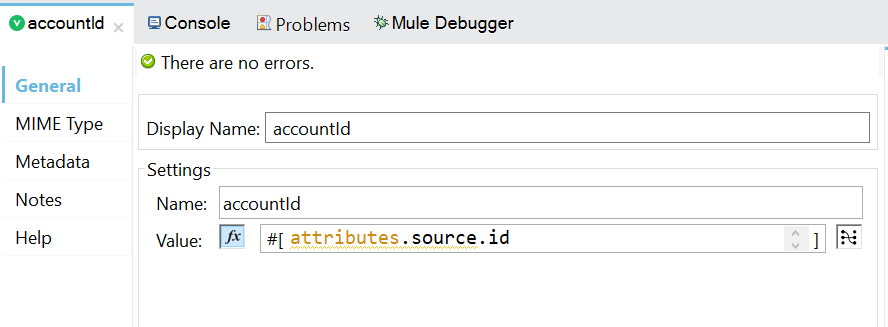
- Set variable configuration:
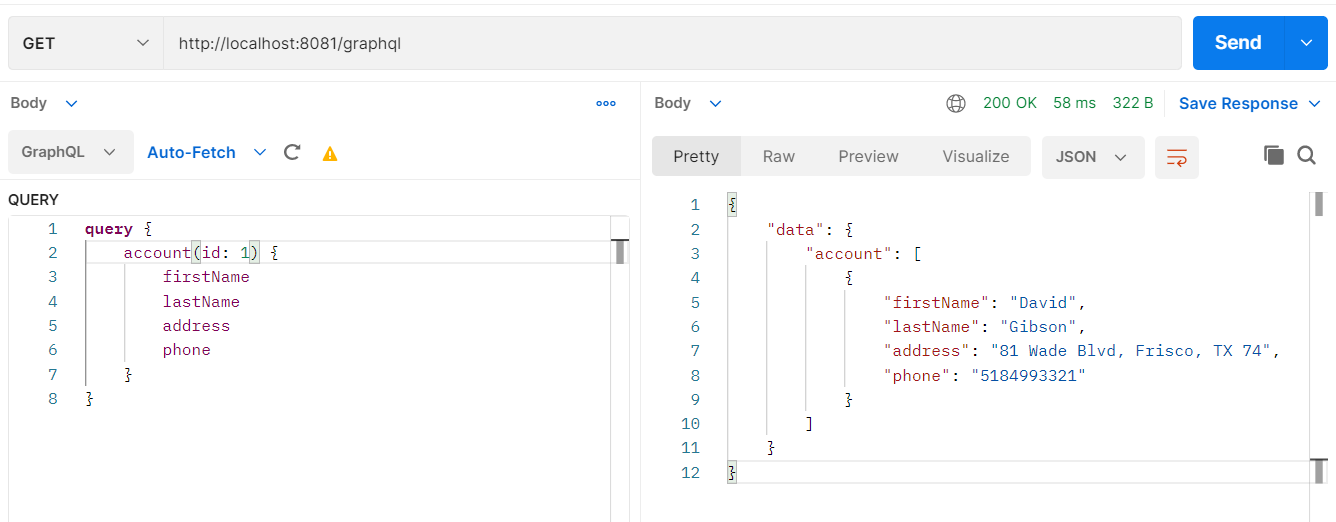
STEP 11: Hit graphql endpoint from postman and keep changing the fields according to requirement.
- Select body -> GraphQL.
USE CASE 3
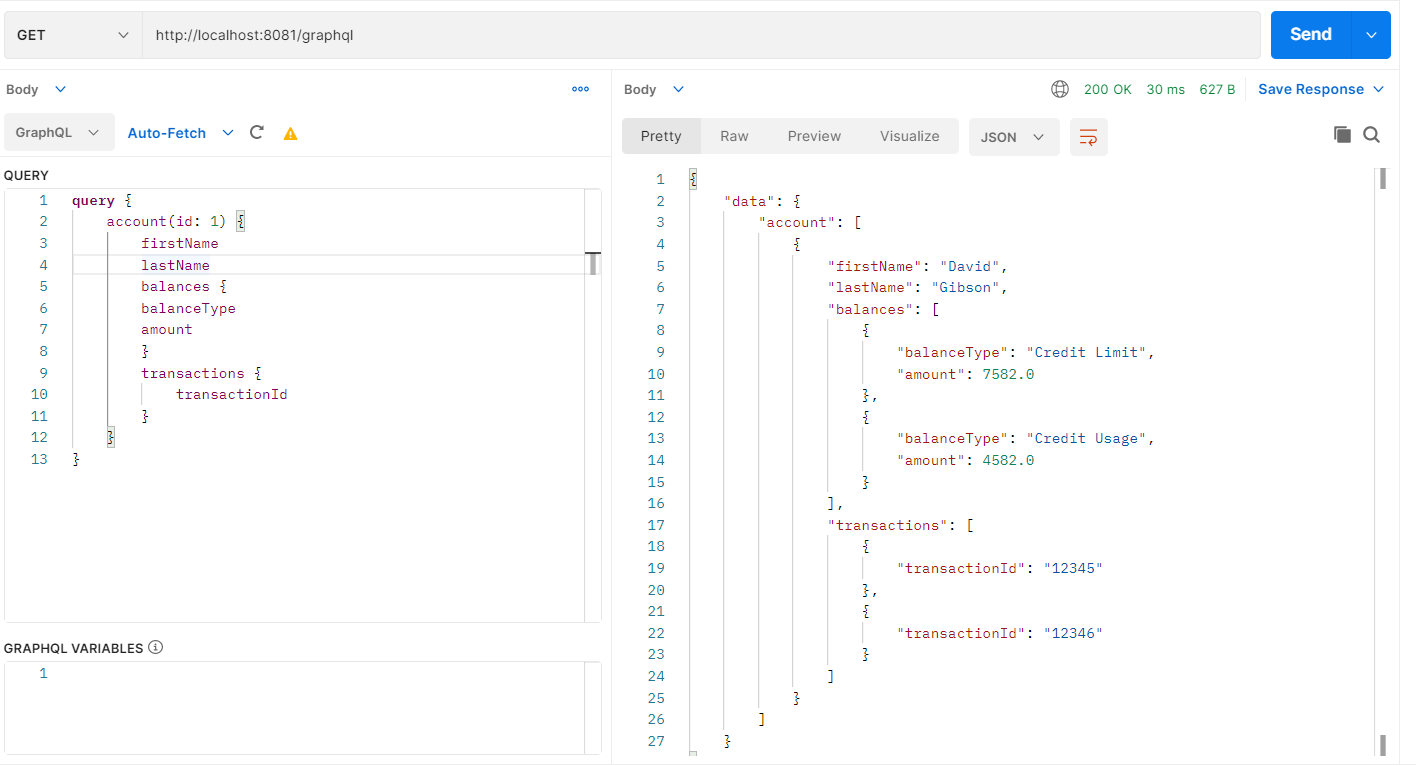
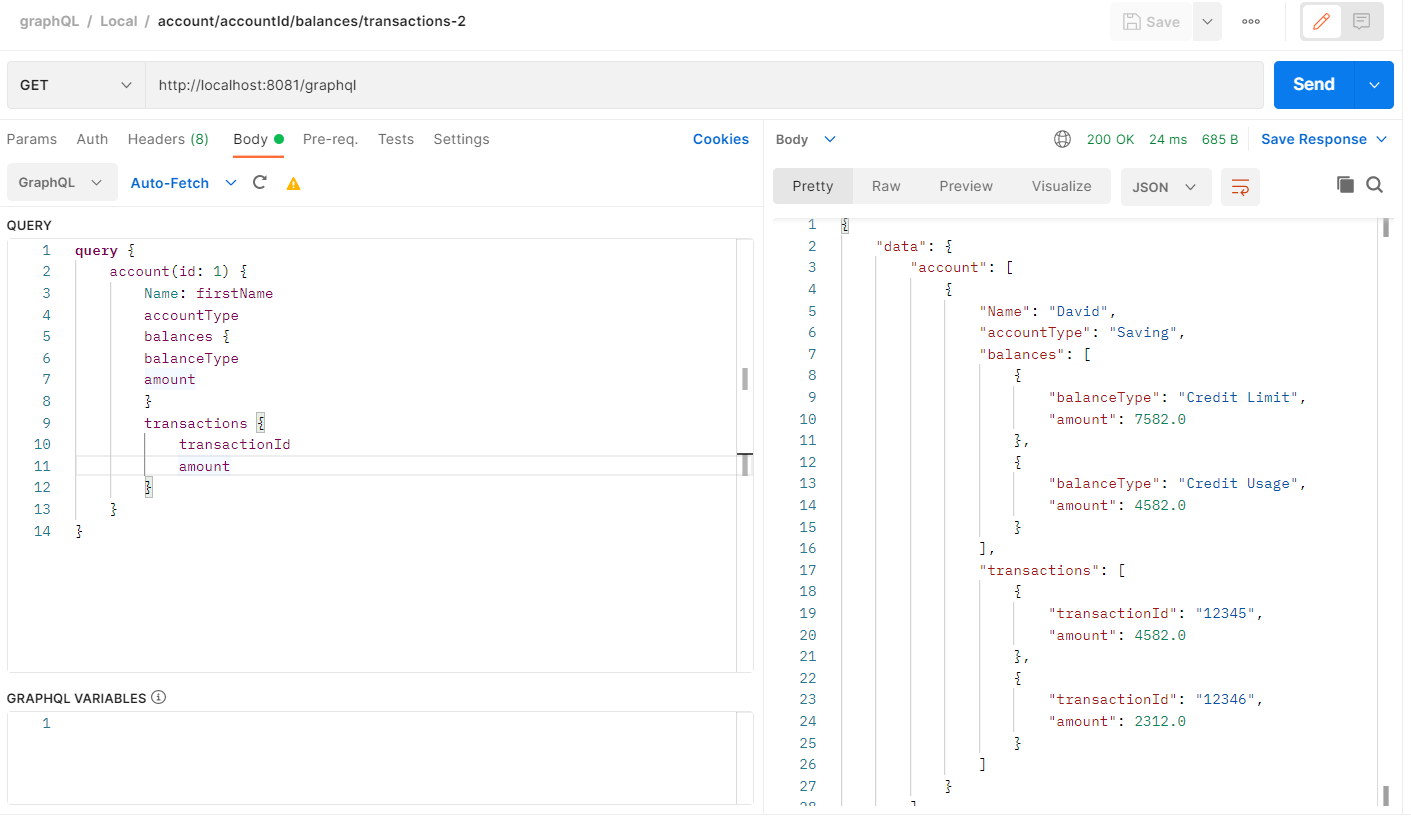
In this use case, the Client 1 requires aggregation of 2 REST API responses i.e., account and balance. Client 2 requires aggregation of 3 REST API responses i.e., account, balance, transaction. GraphQL can route multiple requests from the REST API, aggregating the response from the API, and sending it back to the client. The 3 REST APIs are account, balances and transaction.
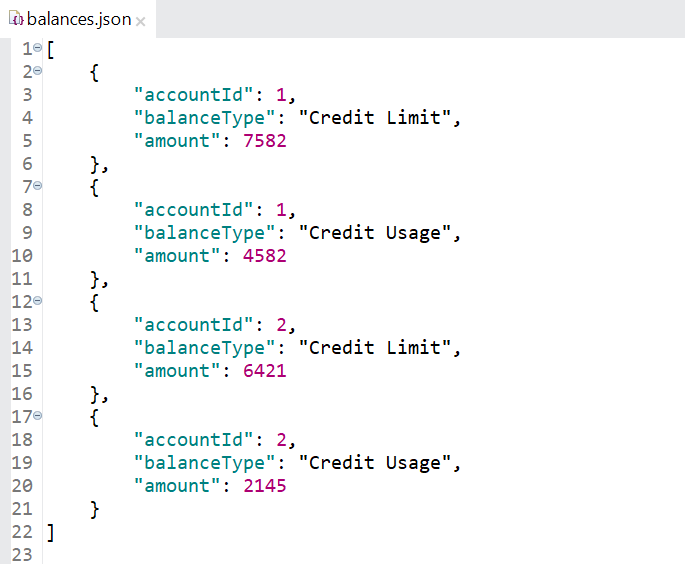
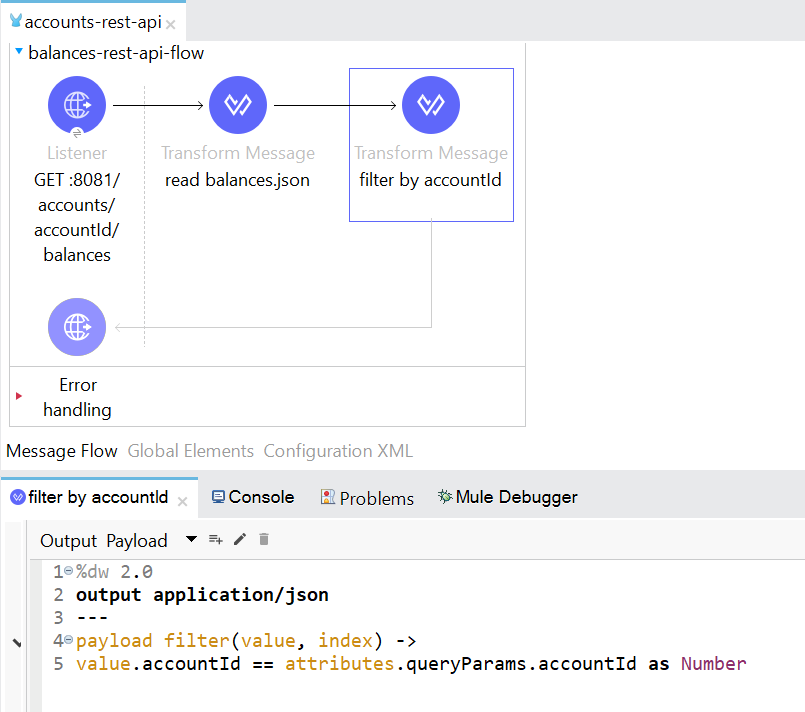
STEP 12: Add balances.json file under src/main/resources.
STEP 13: Create flow as shown below and Read balances.json file using Transform Message as readUrl(“classpath://balances.json”,”application/json”).
- Similarly, Add transactions.json file under src/main/resources.
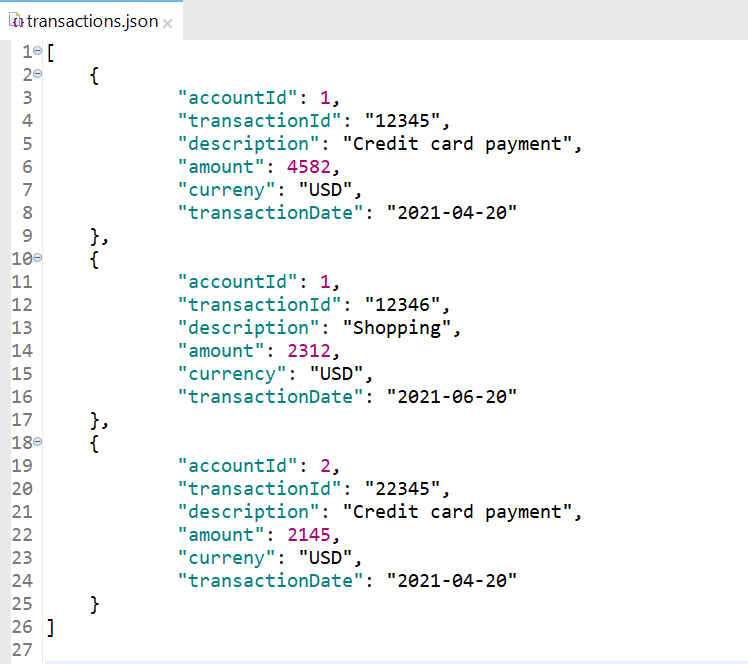
- Read transactions.json file using Transform Message as readUrl(“classpath://transactions.json”,“application/json”).
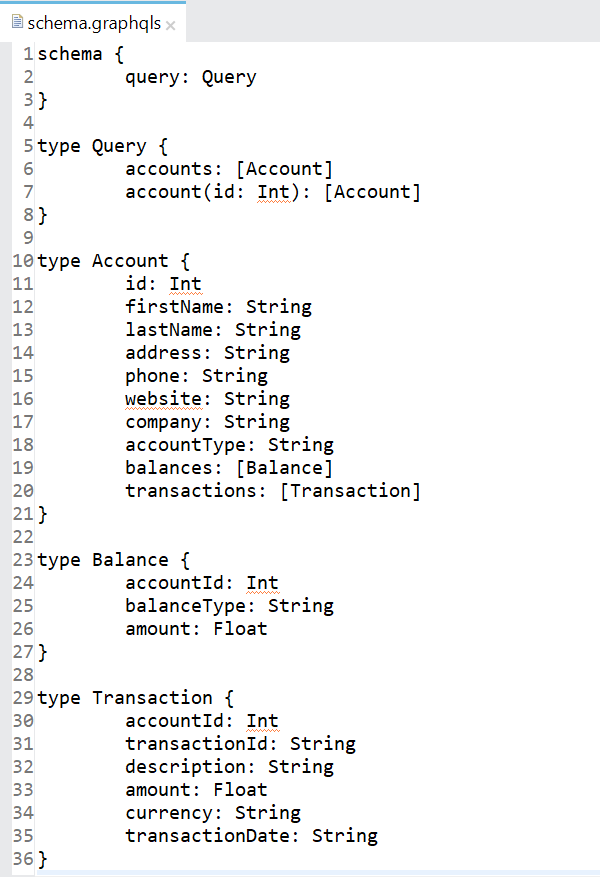
STEP 14: Edit the schema.graphqls file.
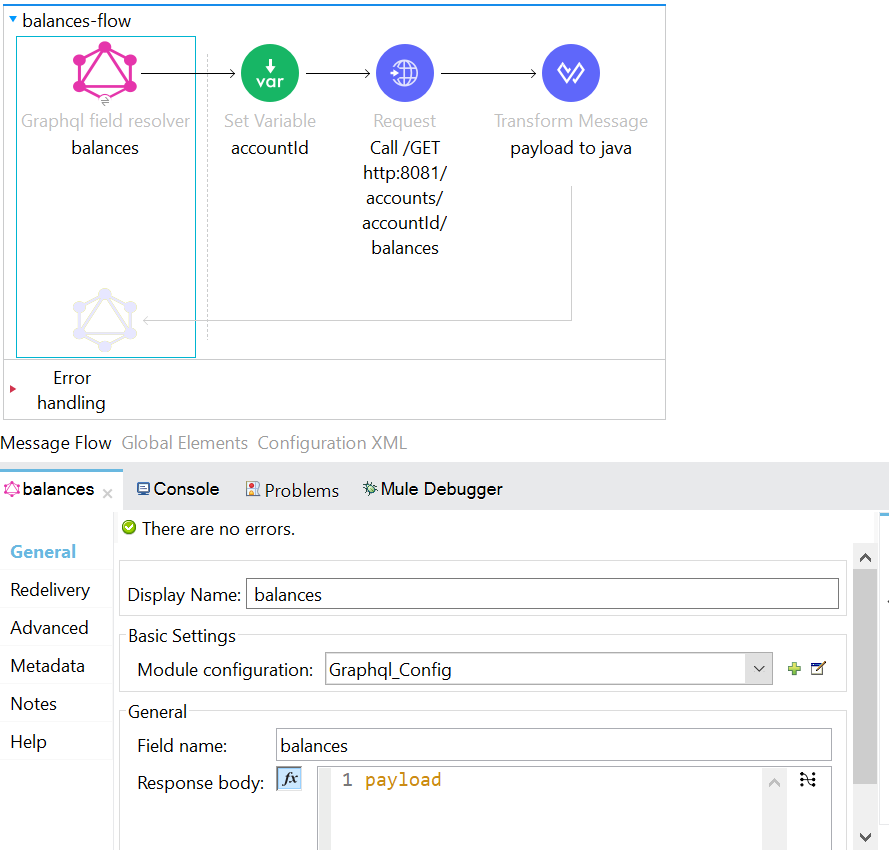
STEP 15: Add following flows. In GraphField Resolver gives Field Name as balances.
- Similarly create flow for resolving transactions and give Field Name as transactions in Graph field resolver component.
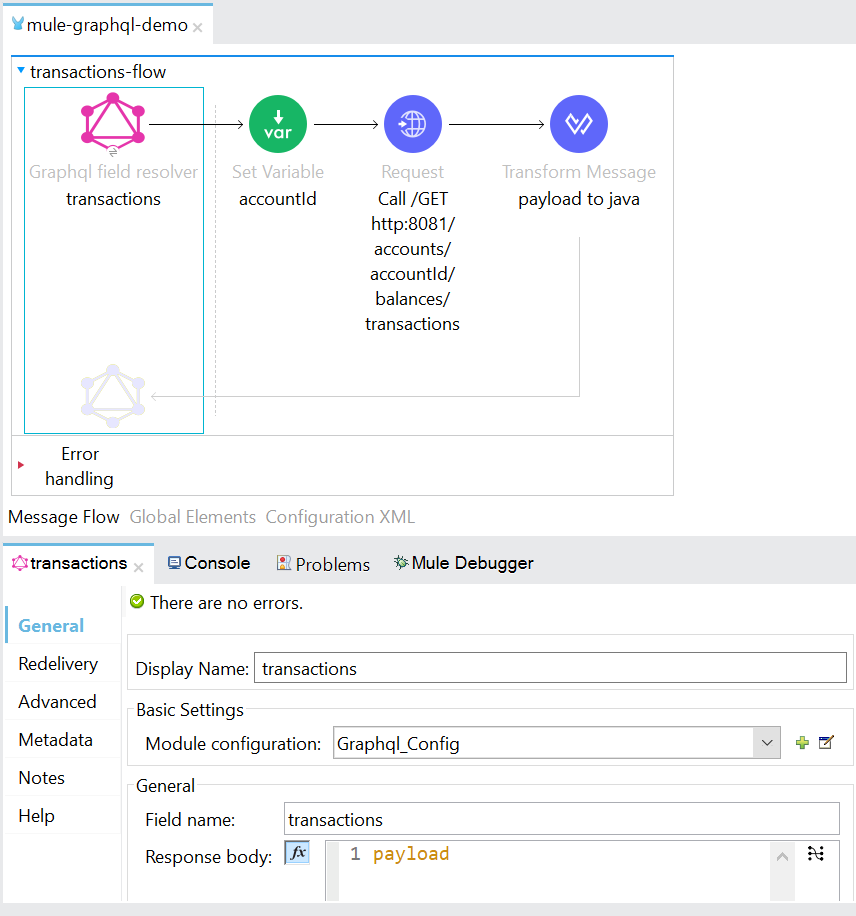
- Set Variable configuration
STEP 16: Hit graphql endpoint from postman and keep changing the fields according to requirement.
-
- Select body -> GraphQL.
For balances data
For Transactions flow
STEPS TO DEPLOY APPLICATION ON A CLOUDHUB:-
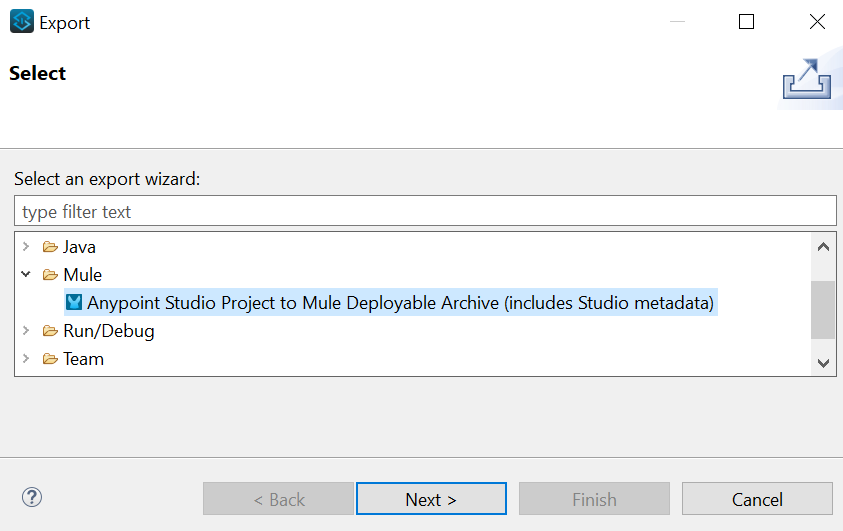
1) Right click on the project. Extract -> Mule -> Anypoint StudioProject to Mule Deployable Archive.
So it will create a jar file.
2) Now Login to your Anypoint Platform account and go to the Runtime Manager
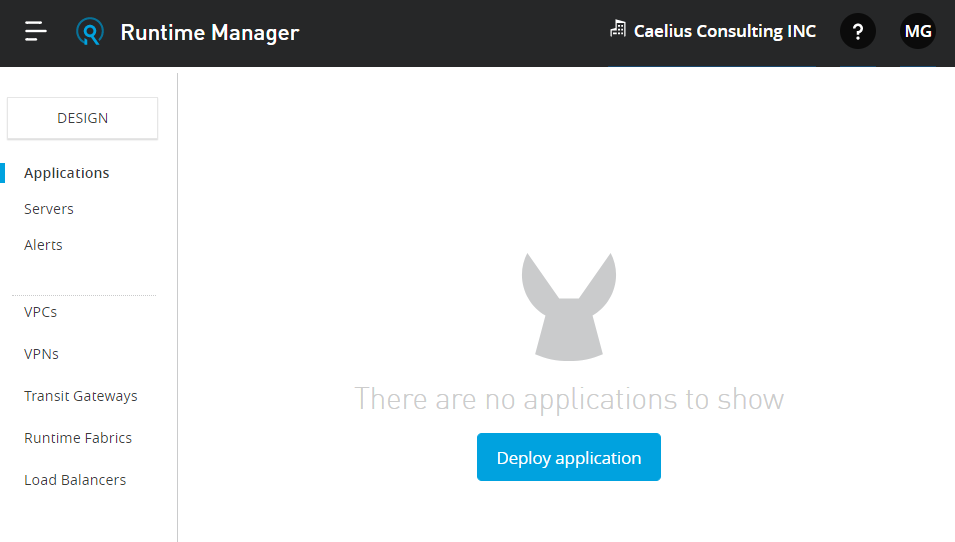
3) Click on the Deploy Application -> Select the jar file -> Deploy Application.

4) Check logs.
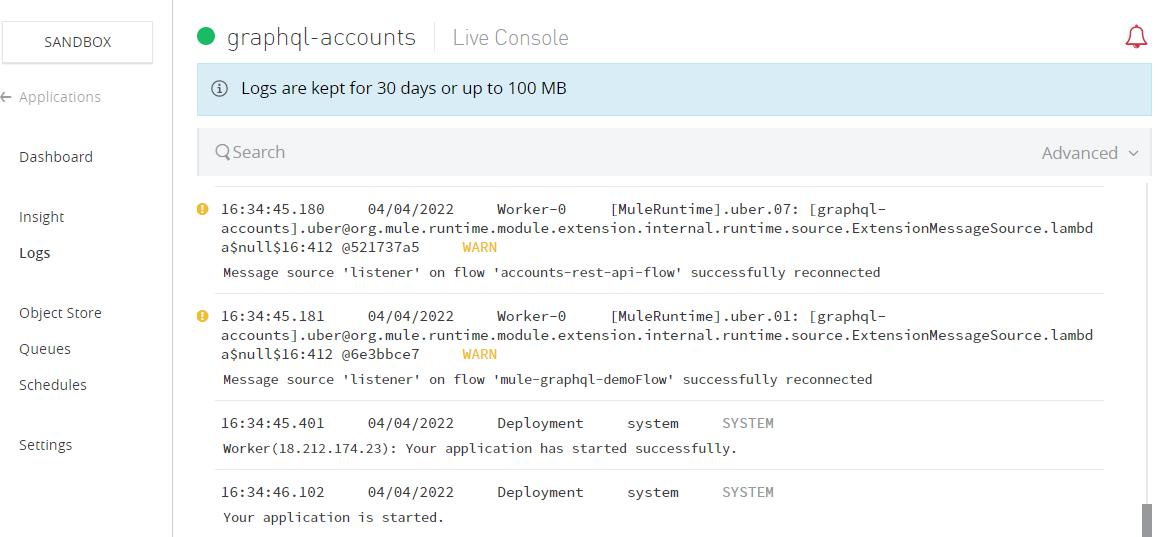
After successful deployment, it will show a ‘Your Application is started’ message.
Now your application is deployed successfully.
THANKS
Recent Blogs
NetSuite Integration using MuleSoft
NetSuite is a cloud-based enterprise resource planning (ERP) software suite that...…
Learn how MuleSoft & Salesforce helps businesses create incredible digital experiences. Speak with one of our consultants today
Let's Work Together