MuleSoft Robotic Process Automation

Employee Onboarding Automation with MuleSoft RPA


Many processes in HR need a lot of time and attention during the onboarding process. However, MuleSoft RPA can be an asset in HR as it can be one of the primary and most desired use cases. The HR team can focus on the new employee while the bots can take care of the administration process.
Here are some typical applications of an automated onboarding system:
a. Simplify your onboarding workflows:
Once an employee accepts the job offer, the automated process can:
Notify IT to create a user account (especially for social media and IT managers/salesforce)
Send a welcome email explaining company perks, culture, policies
Notify someone to send out a welcome package
Prepare teammates to block their calendars
Track their onboarding process and smooth the transition to their new role.
b. Instantly integrate apps
Communication apps like Slack, Teams, Notion, etc have made it possible to work remotely. Automate and streamline your communication process by connecting people no matter where they are. By connecting apps like Microsoft Teams or Slack you can…
Automatically add new hires to an onboarding channel
Send them Regular piece-by-piece info, tasks, and reminders
Connect new hires to their onboarding buddies and notify both via Slack/Teams
Schedule orientation/onboarding meetings
c. Send out quizzes and surveys.
Surveys are a powerful strategy to improve your onboarding program. They enable you to understand how your employees view and perform during onboarding. You can also learn other employee information through surveys to prepare custom-made company swag. On the other hand, quizzes are a great way to make learning easy and fun.
Automatically send surveys to new hires to learn about their preferences for the company swag.
Get notified when the new hire completes the first day, 30th day, or 90th day of the onboarding to send feedback forms.
Send automated reminders for training sessions, quizzes, etc.
In this blog we will explore how to execute the RPA process for Employee Onboarding.
When a new employee is onboarded, the first step is creating an organization account for him and communicating the account credentials to that new employee through email.
There could be two ways an organization may create accounts for the newly onboarded employees :
- Using google workspace
- Using the HRM portal to consume Rest API
This tutorial will show you how we can automate the complete process based on the user’s choice of which method he wants to use for creating an account.
The process includes the bot tasks and user tasks. The user tasks are used to get the user’s involvement in the necessary steps during the automation process.
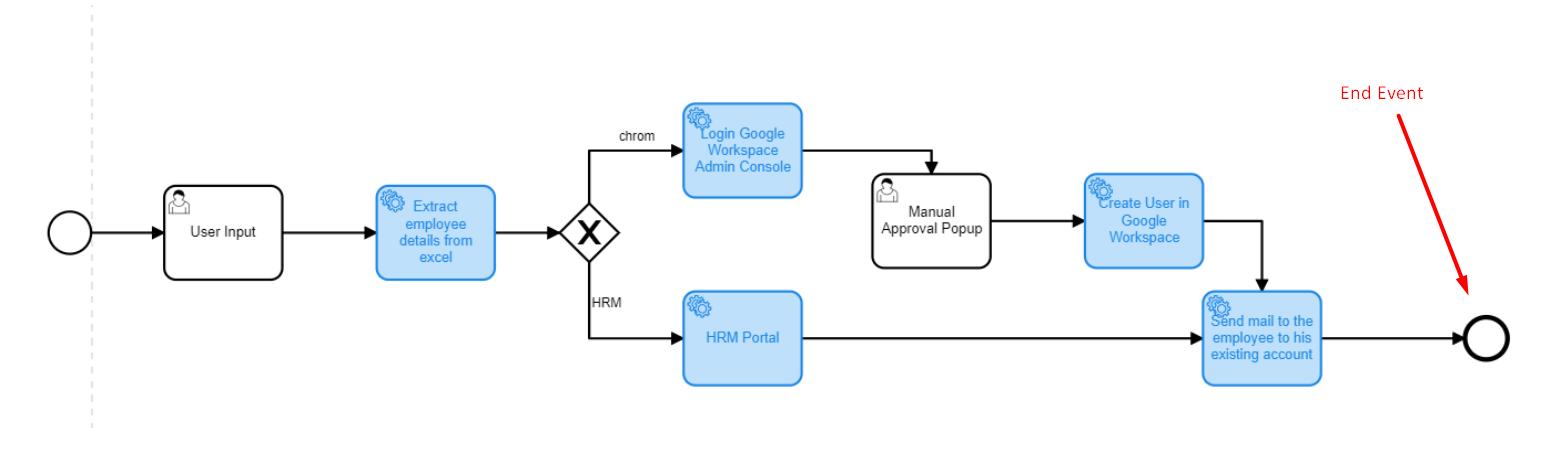
On a high level; in the BPMN diagram we are first taking the user input to decide the flow. Further we will read the data from an Excel sheet and then use this data in the selected flow (Google workspace or HRM). In the next step an organization account would be created and the onboarding notification containing organization email and temporary password will be sent to the employee’s personal account.
Steps performed to build above shown BPMN diagram in RPA builder are as follows:
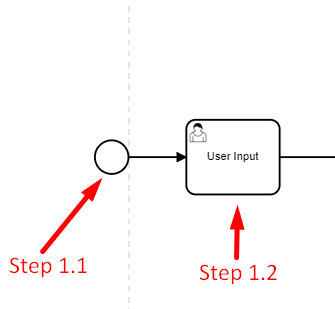
1.1 Each RPA automation process starts with the start event from the toolbox.
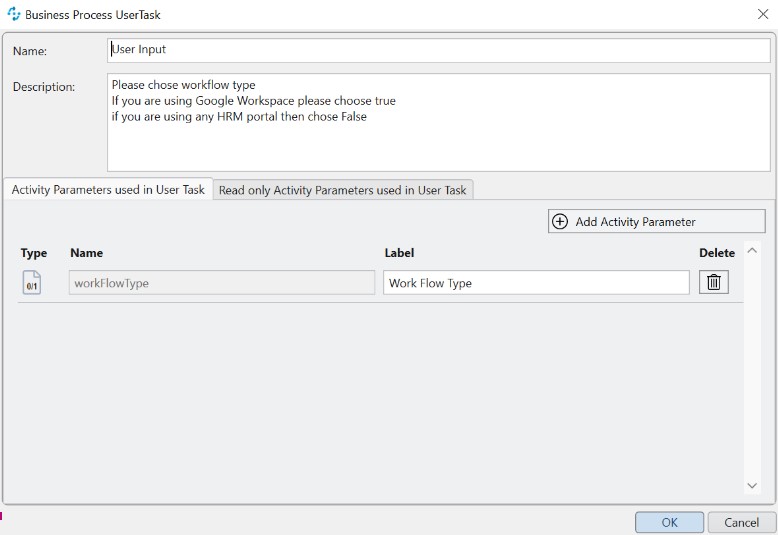
1.2 The very next step is to get input from the user on whether he wants to use the HRM portal or the Google workspace admin portal. Click on the user input task and configure it as follows:
1.2.1 Click on the user input task and configure it as follows:
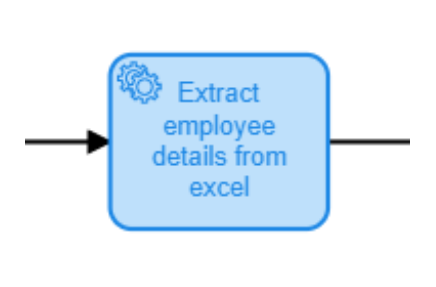
Now we will extract employee detail from Excel.
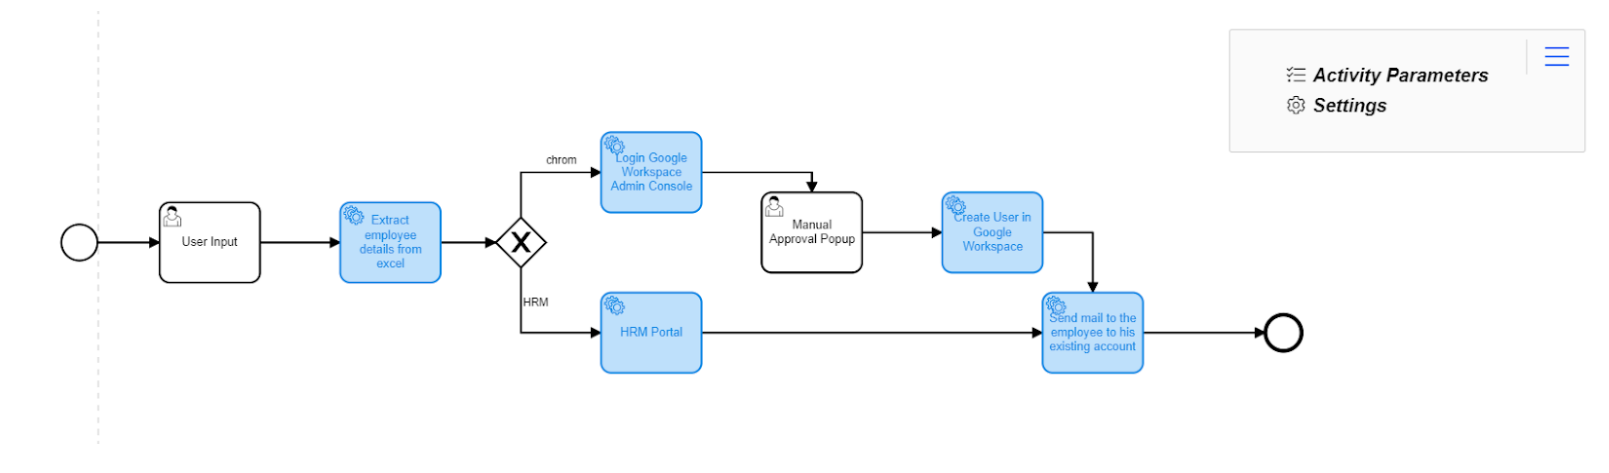
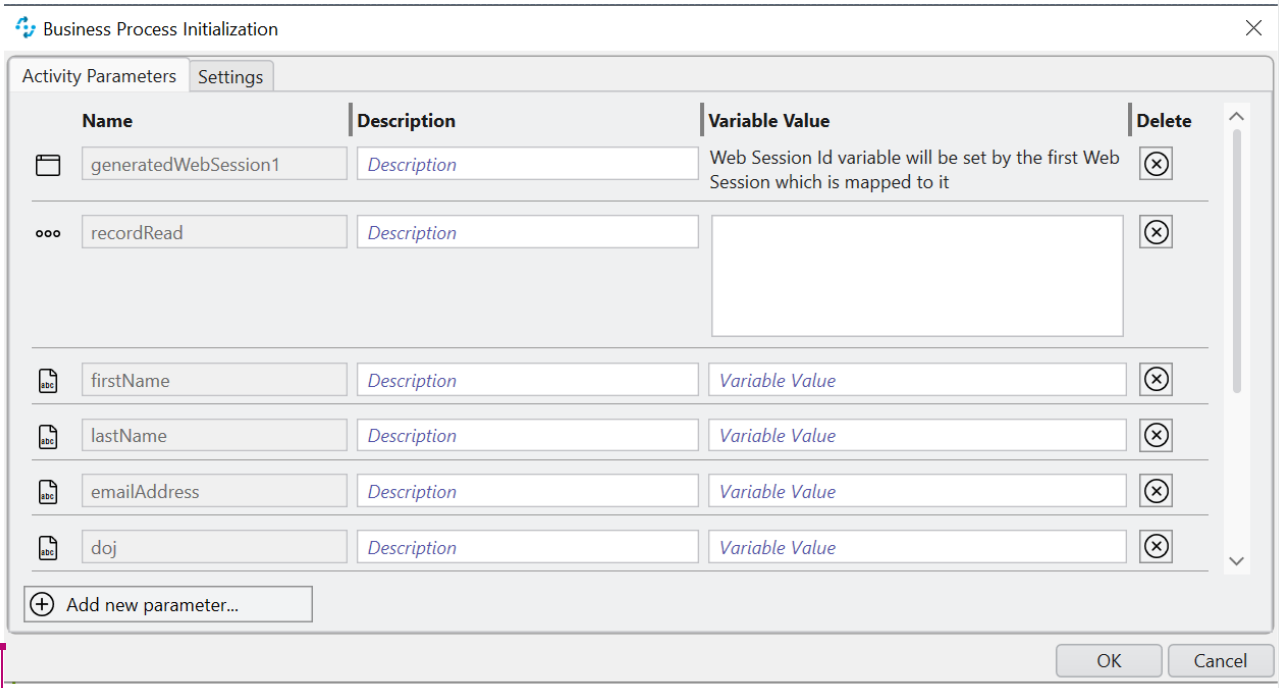
2.1 Firstly we will create global activity parameters. Refer to the image below. Click on three horizontal bars in the top right corner as shown below:
2.2 Click Activity Parameters -> Click on “Add new parameter” from the bottom-left corner from the open wizard after clicking to add activity parameter. You may add as many activity paraments as required. In the snippet below we have added firstName, lastName, emailAddress etc.
2.3 Now we will Extract the Employee Data from Excel. Click on the bot task and configure it as follows:
3.1 In next step we will bind global activity parameters defined in Step 2 with activity parameters in current workflow. After clicking on workflow initialization, we need to double click on activity parameters.
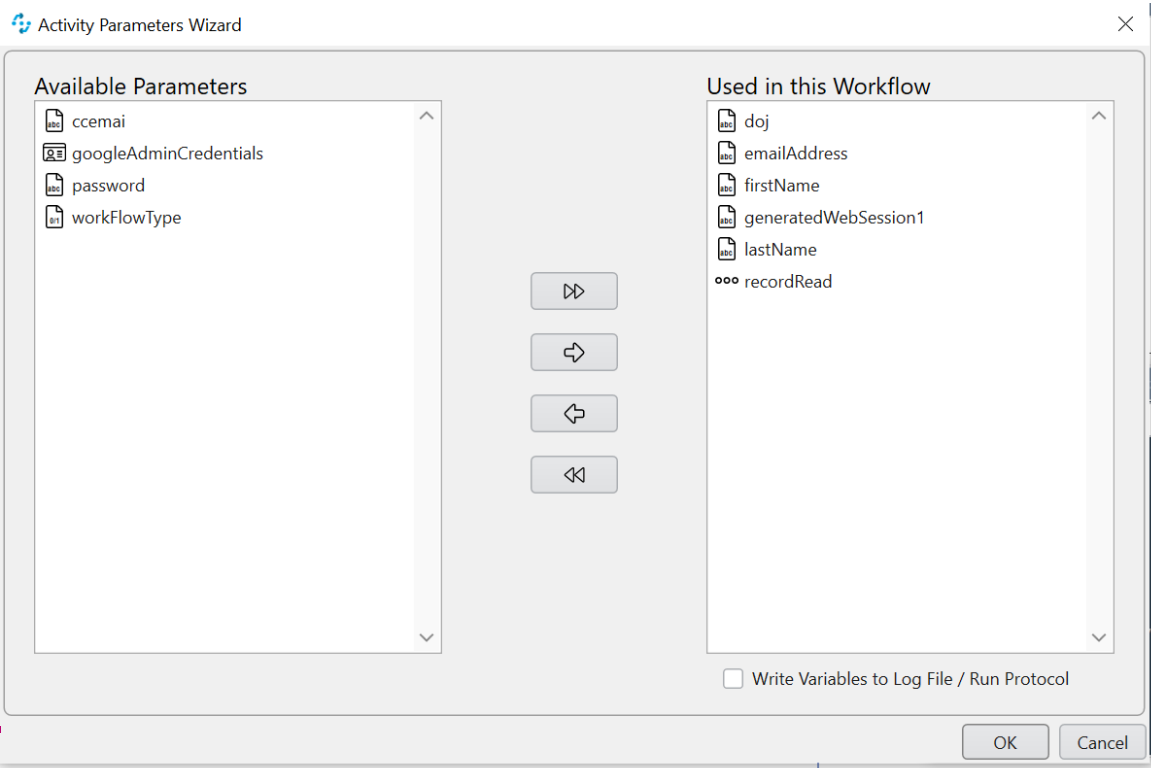
Select the activity parameters you want to add to this flow and click on the arrow; you will notice that those selected parameters get moved to the right. This means global activity parameters are now available in the current workflow. If you do not perform this step, you will be unable to use those global activity parameters in your current workflow.
3.2 Now you need to drag and drop the action steps from builder tools to your Transaction inside the Activity workflow block. Refer to the below screenshot to add the excel session, read from the array, set variable, etc., Remember to add them in the given sequence, as shown in the snippet.
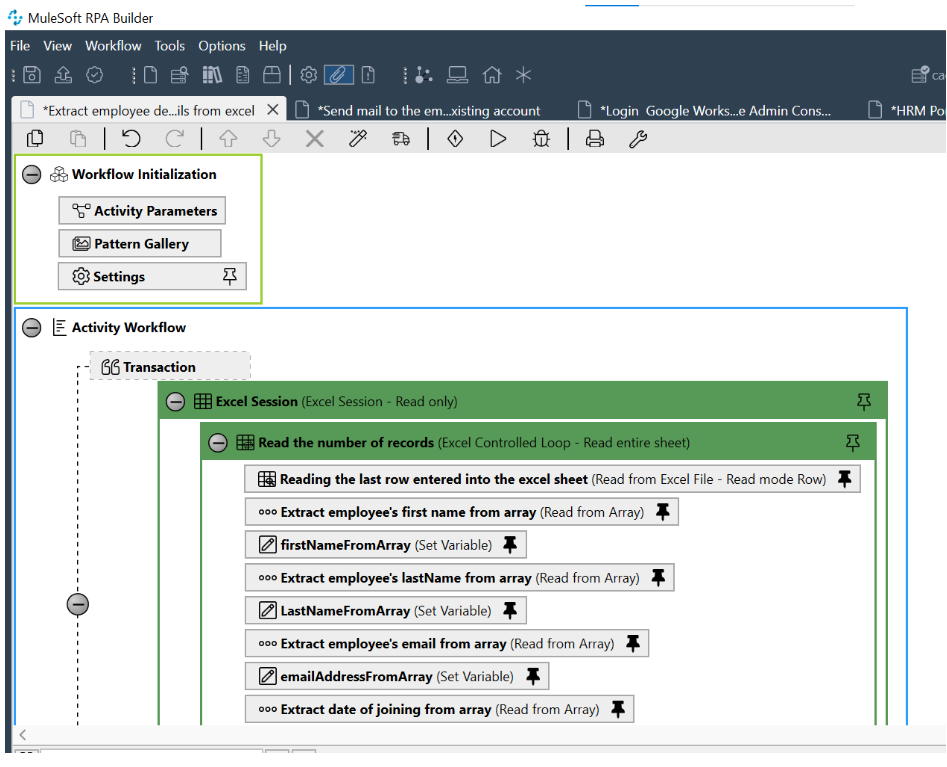
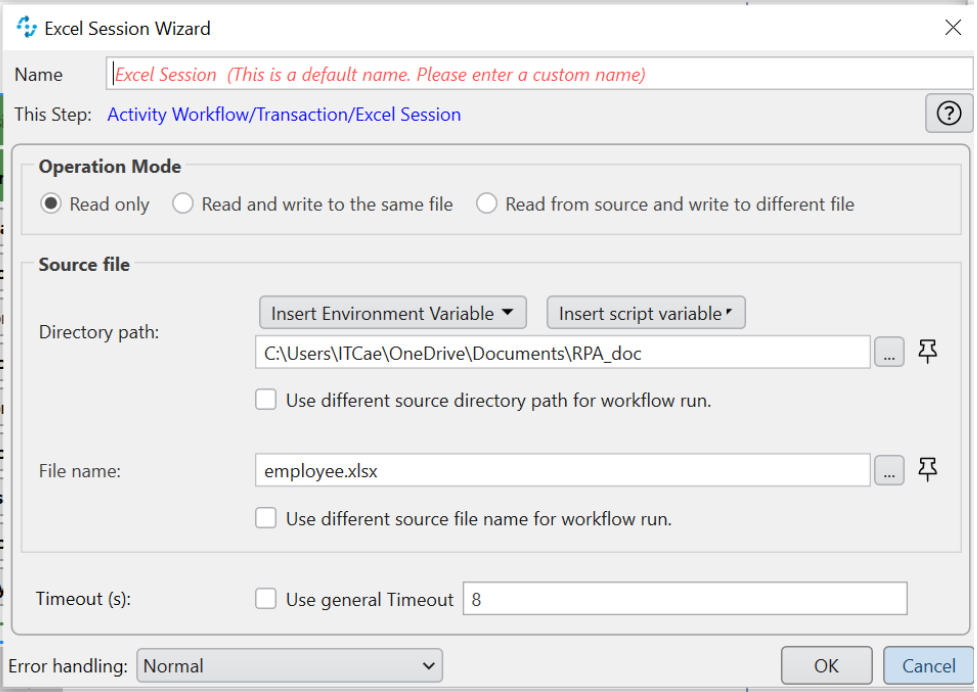
3.3 Now we will configure excel sessions:
3.4 Excel Controlled loop Action Step Configuration:
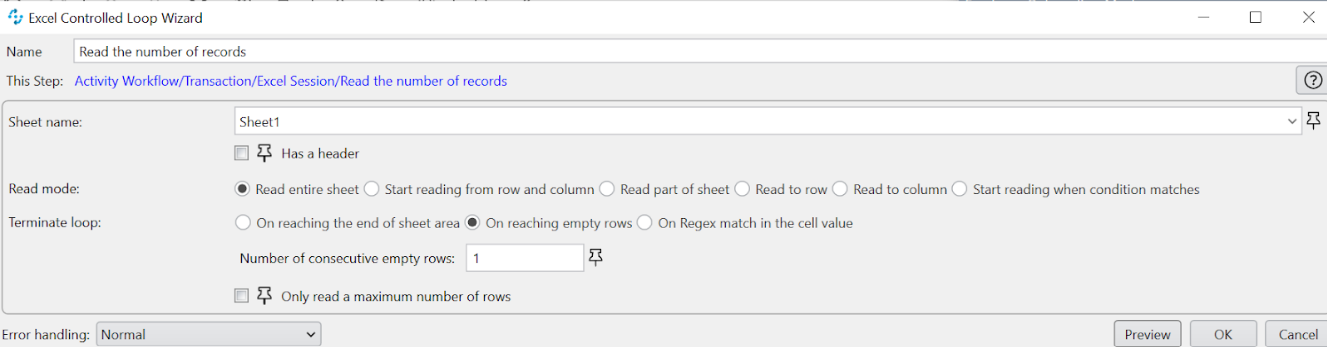
3.4.1 Read the last row entered into the excel sheet Action Step Configuration:

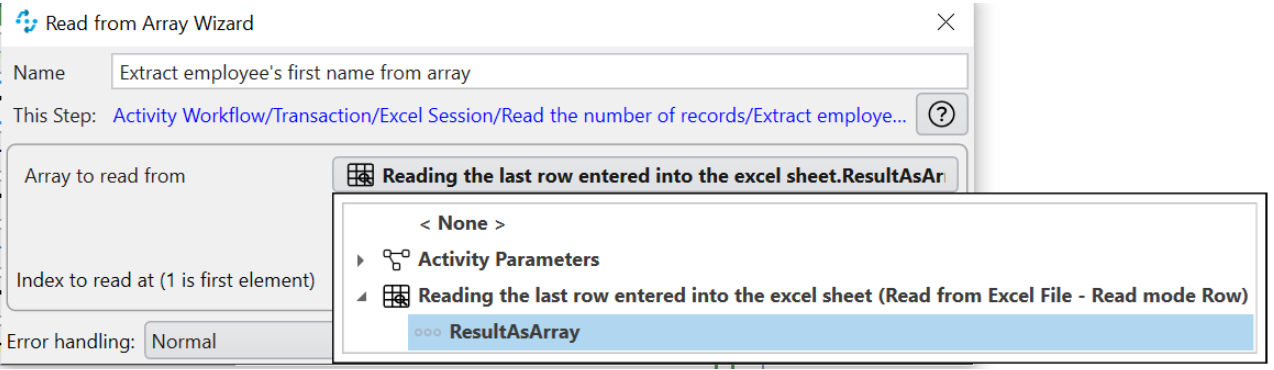
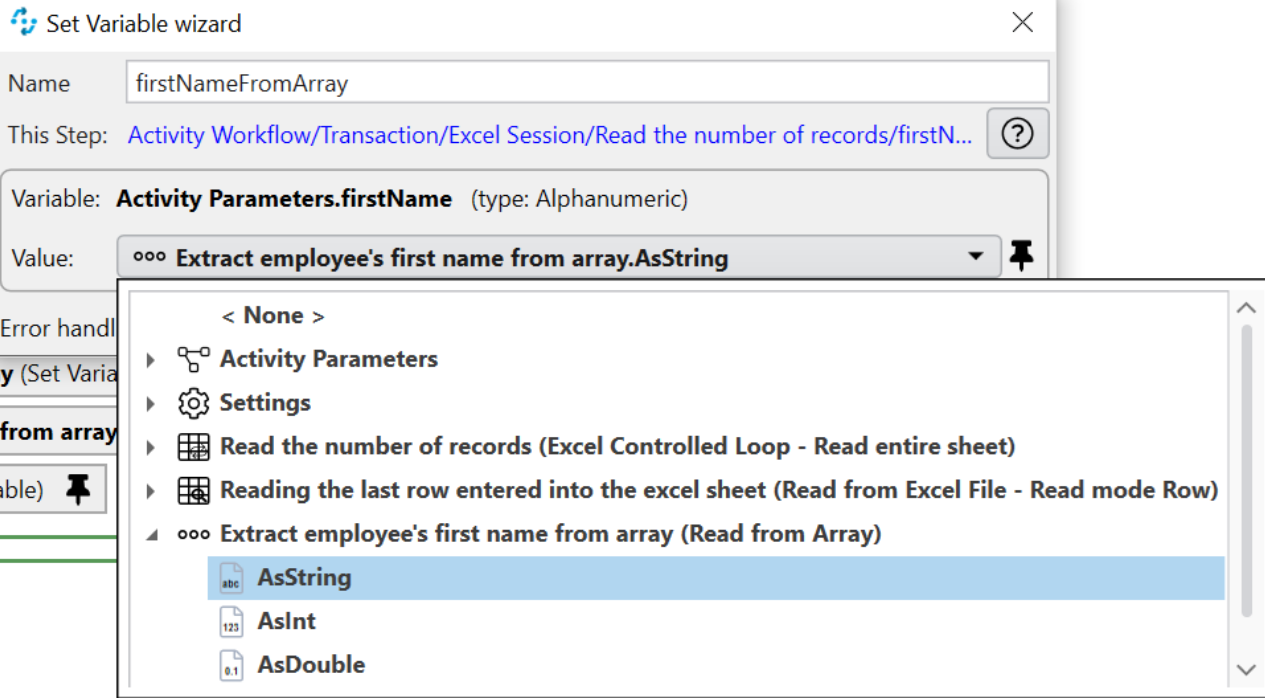
3.4.2 Extract employee’s firstName from array Action Step Configuration: we use the outbound variable “ResultAsArray” from the previous Action step and fetch the value at index 1 in the array. It returns the read value as outbound variables: AsString, AsInt, and AsDouble, which we use in the next step.
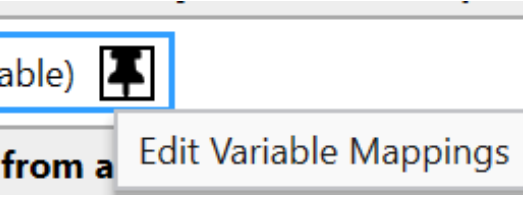
3.4.3 In the subsequent steps, we will set the firstName in the global activity parameter for using the same value in another workflow. Click on the pin on the right side of the set variable action step. Further we need to map firstName with global activity parameter.
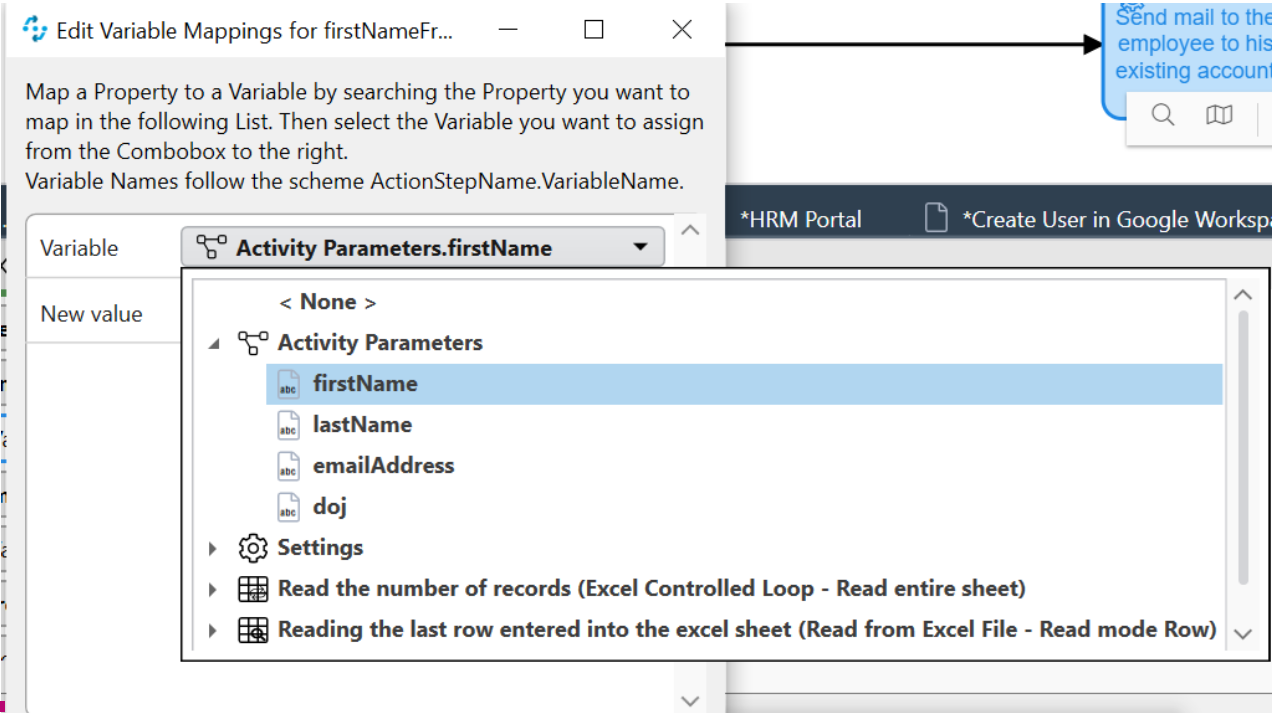
3.4.4 Now to add the value to this mapped activity parameter, double click on the set variable action step, and a wizard will open, in this case we want the firstName as a String. The configuration for the same is as follows:
3.5 In order fetch the Last Name, Email & Date of Joining from the Excel sheet, we need to repeat the same steps from 3.4. We will only need to change the excel column index respectively for last name, email & date of joining (for the first name this action is performed in 3.4.2)
In the step 1.2, we were having a choice of selecting the workflow types like Google Workspace or any HRM portal. We will first explore HRM portal workflow followed by Google Workspace.
4 Creating an account using HRM portal: Initially we need to follow the same steps followed in the step 3.1 i.e. binding the global activity parameter to the activity parameter of the current workflow.
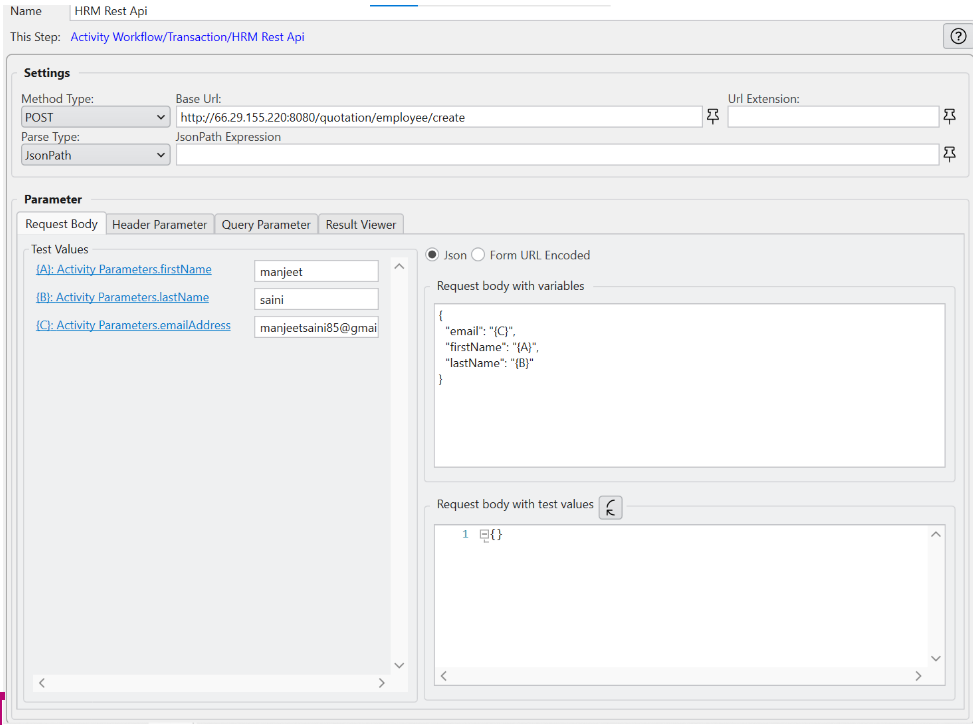
4.1 Now you need to drag and drop the REST API action steps from builder tools to your Transaction inside the Activity workflow block. See the configuration for the Rest API call below. To use the activity parameters in the request body we need to map those to test variable as shown below. As you can see we have mapped firstName to {A}, lastName to {B}, email address to {C} test values and these test values are referenced in the request body.
4.2 Sample response after configuring the REST API with correct configuration.
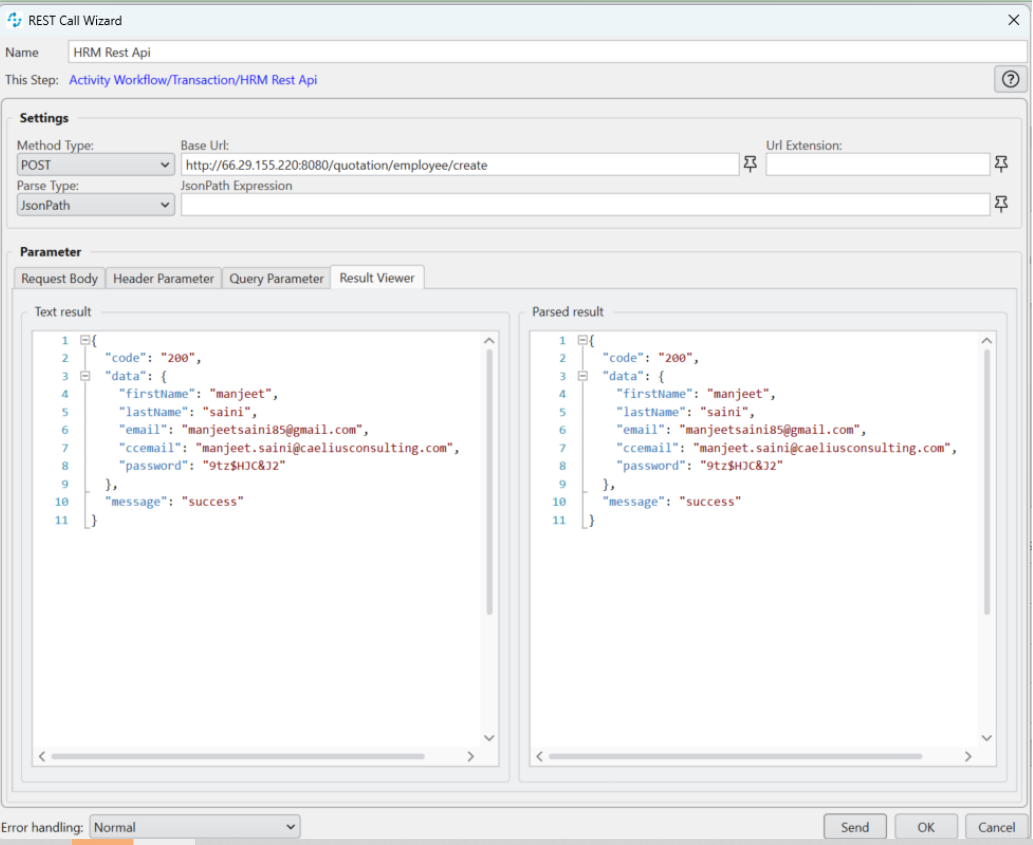
After getting the correct details like organization email ID and temporary password, we will further trigger a mail with onboarding template.
5 Sending onboarding email to the employee with organization detail on personal email ID:
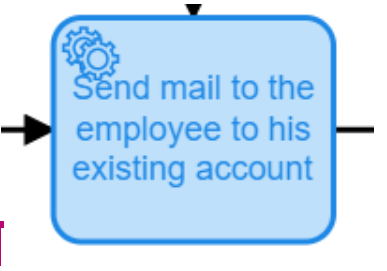
In the BPMN Diagram, we will build this bot task. After double clicking on this BOT in the activity workflow, drag and drop a mail session action step from toolbar inside the transaction.
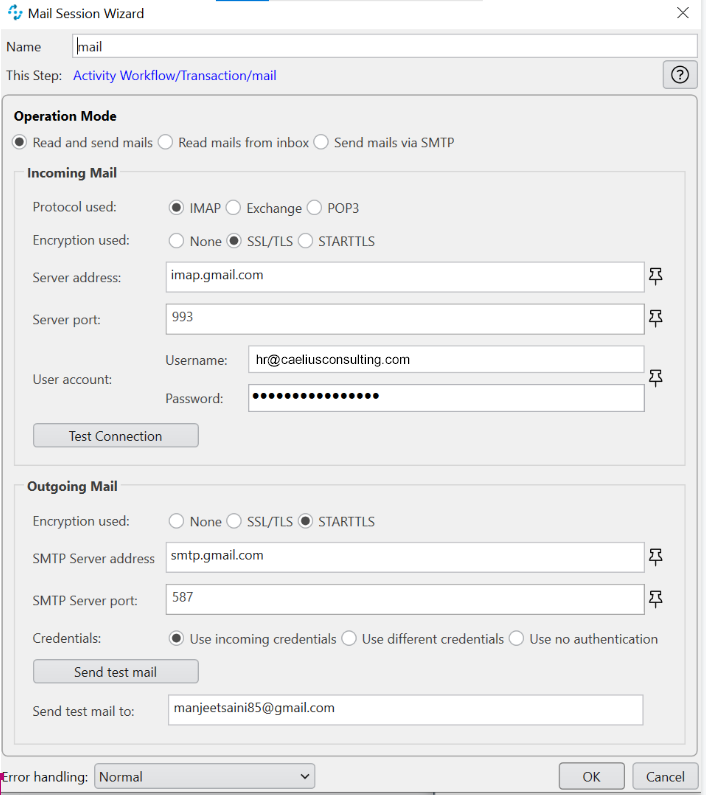
5.1 In mail session, we will add send mail action step and configure it with our HR credentials.
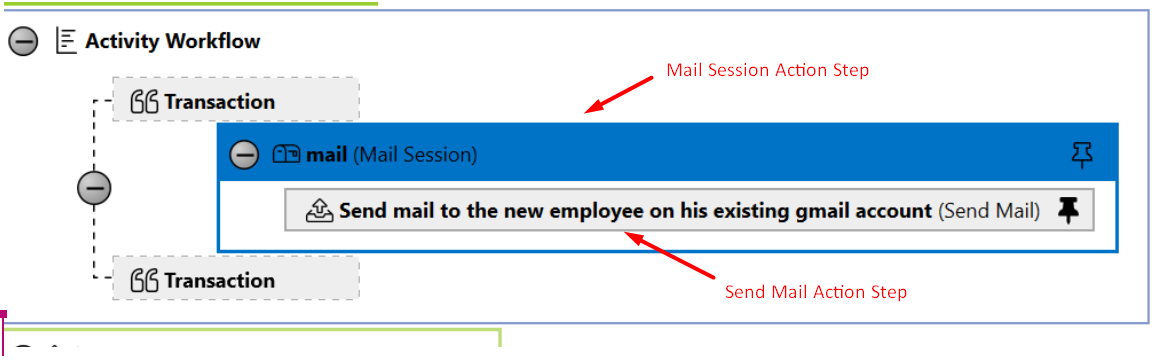
5.2 We will configure the mail session as shown in the snippet below.
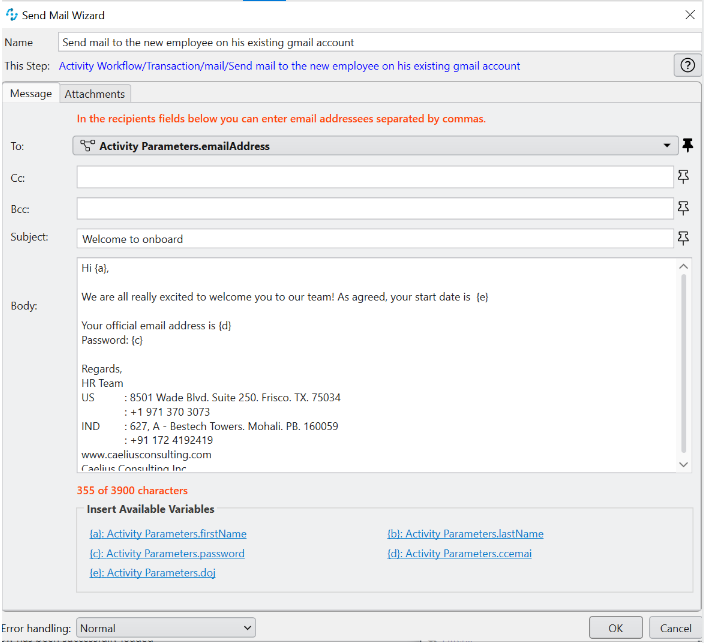
5.3 Now we configure send mail action: In this action step, we will map the activity parameters to the variables, which can be used in the body of the mail. Here we have mapped {a}, {b}, {c}, {d}, {e} variables to firstName, lastName, password, cc_mail, DOJ activity parameters respectively. Furthermore, we will create onboarding template as per the content in the body section of send mail wizard (see snippet below).
As per the BPMN Diagram, this is the last step and now will terminate the workflow with end event.
In the next section, we will explore onboarding of an employee if the organization is using Google Workspace.
Before going in the workflow, we have divided the Google Workspace scenario in three sections. Two of these sections comprises of BOT Tasks and one User Task. The Google Workspace asks for an additional authentication when you are using it with any Automation Tool.
The User task is introduced in the workflow as mentioned in the BPMN diagram to approve Google Authentication named as manual approval pop-up.
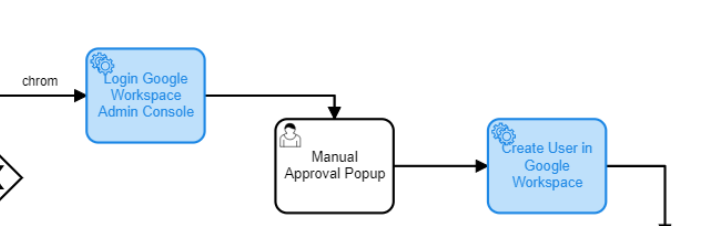
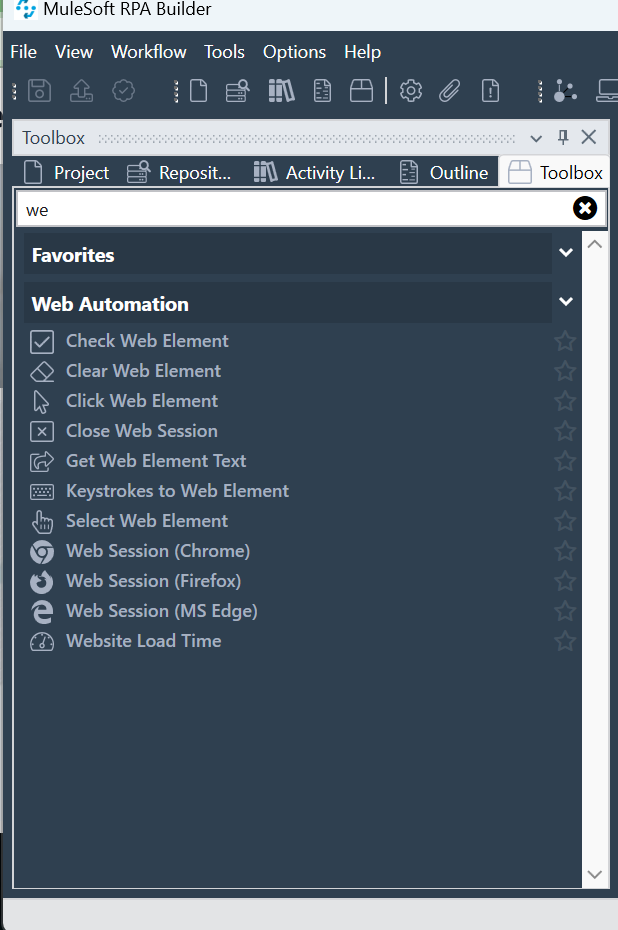
In order to automate the Google Workflow scenario we used web automation concept, and the elements used for web automation are also available in the MuleSoft RPA builder under Web Automation toolbox. We can leverage the various tools (as shown in snippet below) under web automation to build and execute this workflow.
Post this step , we will further trigger a mail with onboarding template as explained in step 5 onwards.
Recent Blogs
Understanding Salesforce Flow Approval Processes
Introduction: Salesforce introduced Flow Approval Processes in the Spring '25 re...…

Capturing Real-time Record Updation Using LWC
Introduction In modern CRM ecosystems, real-time Salesforce integration and s...…
All About Schedulers: Mule 4
In the world of Mule 4, automating repetitive tasks and triggering flows at defi...…

Demystifying CloudHub 2.0 Networking
CloudHub 2.0 is the latest version of MuleSoft's powerful managed runtime platfo...…
Learn how MuleSoft & Salesforce helps businesses create incredible digital experiences. Speak with one of our consultants today
Let's Work Together