MuleSoft Technical Guides

Custom Connectors using Java SDK in Mule 4


What are Custom Connectors?
Connectors are modules in Mule 4 that let developers increase Mule’s functionality by enabling connectivity to external systems and services. The Mule SDK, a collection of tools and frameworks that let programmers construct custom modules for Mule, is used to build bespoke connectors.
Mule developers can link applications with other systems and services without having to create complicated integration code again and again thanks to custom connectors, which offer a streamlined interface for connecting to them. Moreover, custom connections offer a uniform and standardized method of gaining access to other systems and services, which lowers maintenance and development expenses. And can be used multiple times.
Mule SDK
Mule is an integration platform that can be extended and customized by developers to match their unique integration needs. Mule SDK (Software Development Kit) is a collection of tools, libraries and frameworks that makes this possible. The SDK offers an extensive collection of tools, libraries and frameworks that let programmers build unique connections, processors, and modules that can be used in mule to Mule.
The Mule SDK, which is built on the Java programming language, enables developers to add new components to the Mule runtime engine. Developers can build custom message processors to alter messages in a particular way, build custom modules to add new functionality, or build custom connectors to integrate with third-party systems using the SDK.
In general, the Mule SDK gives programmers a method to create unique integrations on top of the Mule platform, which can assist to shorten development times and improve the adaptability of the integration solutions they create.
Java SDK
MuleSoft’s Connector DevKit and Mule SDK employ the Java Development Kit (JDK) to create unique connectors for the Mule runtime using Java. This is referred to as Java SDK in Mule SDK.
The Java SDK must be installed on the developer’s computer in order to create custom connectors for the Mule runtime using Java. Java SDK is a crucial part of the Mule SDK. The Java SDK contains the Java Runtime Environment (JRE) in addition to the tools and libraries needed for creating and compiling Java programmes.
The business logic and functionality of a custom connector created using the Java SDK may be implemented using Java.
Java SDK Module Structure
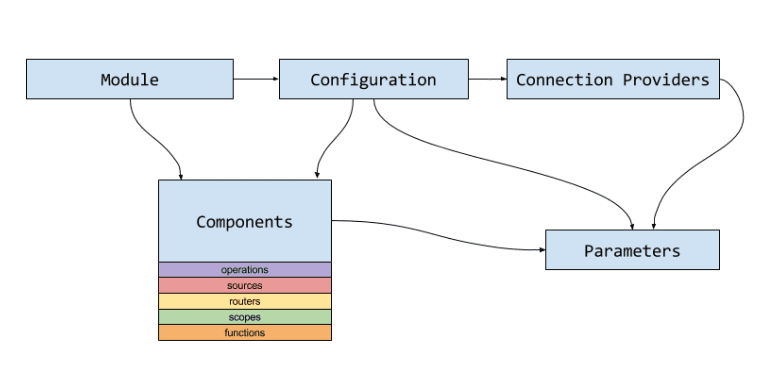
Mule Java SDK’s module structure consists of several components that work together to create a functional Mule module. Here is a brief overview of the main components:
- Mule Module: This is the top-level component of a Mule module, and it contains all the necessary configuration and metadata for the module.
- Components: A module’s ability to function depends on its components. They can be performed to create or modify messages in a flow given a set of parameters.
The most frequent parts of a module are sources and operations:
-
-
- Operations are parts that examine an incoming message and produce a conclusion.
- Sources are parts that bring in or produce fresh messages for the Mule Runtime to process.
-
3. Configuration: A collection of programmable settings known as configurations influence how the Module behaves. Typically, a Configuration provides the settings that govern the behavior of Sources and Operations. Some, though, can function without a Configuration.
Although declaring a Configuration for a Module is not required, you are free to do so. A separate set of parameters may be offered by various configurations, and they may also include a selection of Operations and Sources that are exclusively usable with that configuration.
4. Connection Providers: The module component in charge of managing connections, which are produced by a Configuration, is known as a Connection Provider. For the purpose of provisioning and releasing connections of a certain kind, they concentrate the logic and parameterization.
Connection Providers often require a connection in order to be run, just like Configurations, Sources, and Operations. A link is not necessary but is frequently used. The Connection Provider offers the connections that are used by Operations and Sources.
5. Parameters: The most specific components of the module model are parameters, which are utilized in Operations, Sources, Configurations, and Connection Providers.
They represent customizable elements that hold the specified values or receive values for components to execute.
How to create a custom connector using Mule SDK
Step #1: Install the Required Software
- Java Development Kit 8 (JDK 8) to compile and build your Java code
- Apache Maven 3.3.9 or later to manage your project’s build
Step #2: Generate the project using Maven Plugin
Run the following command on the command prompt where you wish to build the project to create the connector project. We must utilize a Maven archetype since Anypoint Studio cannot presently generate connector projects.
mvn org.mule.extensions:mule-extensions-archetype-maven-plugin:1.2.0:generate
Step #3: Configure
When you run the aforementioned command, you will be prompted for the following configurations:
- Name of the extension
- Extension’s groupId
- Extension’s artifactId
- Extension’s version
- Extension’s main package
Step #4: Import Package
Import the package to Anypoint Studio. After importing, we’ll find the folder structure –
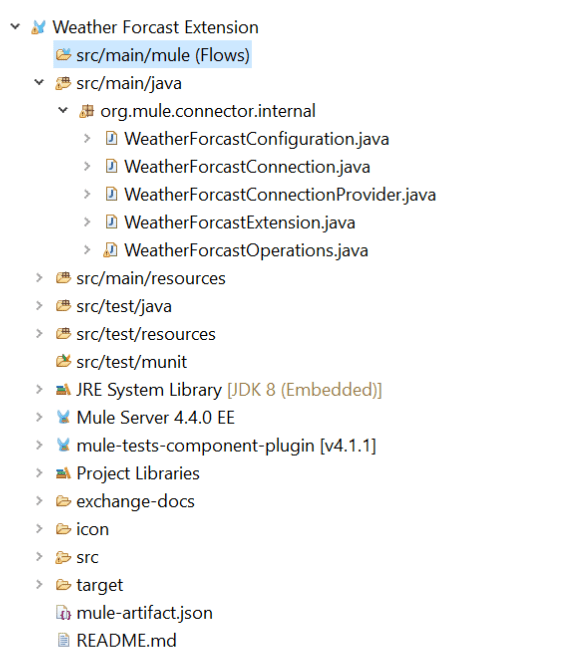
The source Java files for your connector are located in this area, along with the skeleton Java files for connection setup and operations.
When we start this project in Anypoint Studio, several classes will be present and annotated with the Mule SDK annotations as seen below:
- <connector-name>Extension.java: The many characteristics of your connection are identified by this class. A connection in Mule 4 is nothing more than an extension. This class would specify the operation classes and the configuration classes.
- <connector-name>Configuration.java: This is all the data from the Connector’s global setup that you may possibly need.
- <connector-name>Connection.java: In our example, the majority of the actual coding will be in the connection class, which is in charge of handling the connection.
- <connector-name>ConnectionProvider.java: The target system connection is managed and provided by this class.
- <connector-name>Operations.java: All relevant operations must be defined in this class. There may be many files for an operation class.
After creating a sample project open CMD and run — mvn clean install
Errors that may arise while running the above command
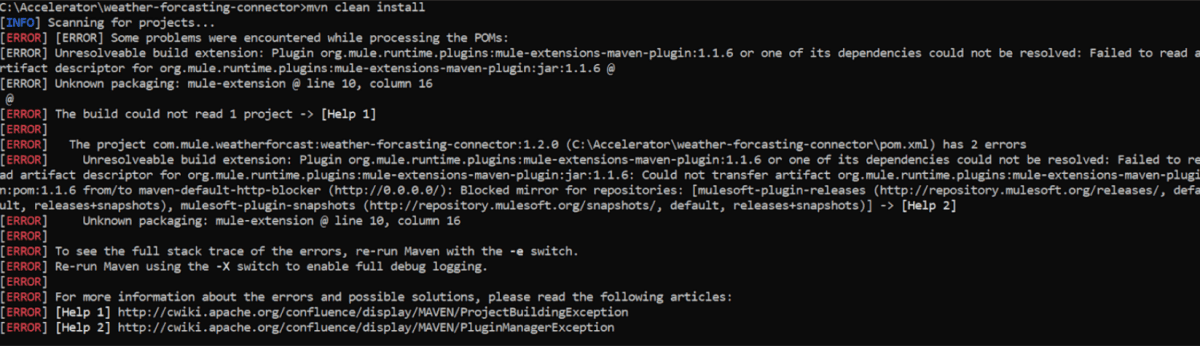
Which can be resolved by adding this plugin repository in POM File.
	<pluginRepositories>
		<pluginRepository>
			<id>mulesoft-releases</id>
			<name>mulesoft release repository</name>
			<layout>default</layout>
			<url>https://repository.mulesoft.org/releases/</url>
			<snapshots>
				<enabled>false</enabled>
			</snapshots>
		</pluginRepository>
	</pluginRepositories>
After successful installation your sample connector is ready.
After adding some updates or modifying java code you need to change the version in POM and re-build the code using the command — mvn clean install.
After successful build updated the version in the project where a custom connector is being used.
Recent Blogs

Message Queue Driven Architecture in MuleSoft using Amazon SQS.
Whenever we are building complex systems using microservice architecture, we oft...…
Learn how MuleSoft & Salesforce helps businesses create incredible digital experiences. Speak with one of our consultants today
Let's Work Together