MuleSoft Technical Guides

Asynchronous Messaging Service


Anypoint Messaging Queue, also known as Anypoint MQ, is a cloud-based messaging queueing service that enables the smooth and secure movement of data between multiple independent instances of one or several applications operating in a shared environment. Acting as an intermediary, Anypoint MQ facilitates safe and reliable data transmission between applications, supporting advanced asynchronous messaging scenarios such as queueing and publishing/subscribing with fully hosted and managed cloud message queues and exchanges. As a part of the Anypoint Platform, Anypoint MQ offers support for environments, business groups, and role-based access control (RBAC), ensuring seamless customer experiences across channels and reliable integration of devices for IoT applications with enterprise-level functionality. Managing the vast amount of data as it moves between applications, systems, and services would be significantly more challenging without an MQ.
A queue serves as a temporary storage space for messages, enabling messages to be sent or received. Essentially, it is a collection of data items that are arranged in a specific order to facilitate retrieval. At Anypoint MQ, we create queues to act as brokers between various applications and services. Within the Anypoint platform, you can generate several types of queues, including standard queues, FIFO queues, and dead letter queues (DLQ).
*Note – To use Anypoint MQ, you must have an enterprise subscription on your Anypoint Platform account.
Types of Destinations
In Anypoint MQ, there are three types of destinations:
- Queues
In the queue (or standard queue), there is no specific order in which the message will be delivered. It is suited for applications in which the message must be delivered quickly.
Anypoint MQ supports up to 120,000 in-flight messages per queue. A message is considered to be in-flight after it is delivered to the customer but is not yet deleted from the queue. In this type of queue, the message is delivered at least once. Due to its highly distributed architecture, Anypoint MQ sometimes delivers the message more than once.
- FIFO Queues
In the First In First Out (FIFO) queue, the messages are delivered in a specific order. It is suited for the application where the order in which the message is sent matters more than the speed of message delivery.
Anypoint MQ supports 10 in-flight messages per message group in the FIFO message queue. In this type of queue, each message is delivered exactly one time to only one consumer.
- Exchanges
A message exchange is used when the user wants to send a message to one or more standard queues that are bound to the message exchange. The user can also create message routing rulers to route a specific message to a specific queue.
There are a few points that should be considered while creating or sending a message to an exchange queue:
- The maximum size of a message that can be sent to a message exchange is 10MB.
- Users can bind a maximum of 450 queues to a single message exchange.
- Users can bind a maximum of 10 queues with routing rules defined to a message exchange. Users can’t use message routing if there are more than 10 queues in a message exchange.
Dead Letter Queues (DLQ)
The Dead Letter Queue (DLQ) is similar to any other queue. In Anypoint MQ, all the messages that aren’t delivered are sent to the DLQ so that it can be analyzed later why the messages weren’t delivered.
The user must have at least two queues for one of them to be assigned as a DLQ. Both of the queues must be:
- Of the same type (standard or FIFO)
- In the same geographical region
- In the same environment and on the same account
Client Application
A Mule app can be registered with Anypoint MQ connector for messaging queue. After the app is registered, it will generate a “Client App ID” and “Client Secret” which can later be used in the Anypoint MQ connector configuration in Anypoint Studio.
Operations in MQ
There are five types of operations in Anypoint MQ:
- Publish
The Publish operation in Anypoint Studio allows you to create a new Anypoint MQ message and send it to a specified destination whether it may be a queue, FIFO queue, or message exchange. With this operation, the user can configure both the content of the message and all the headers and properties needed.
The message mainly consists of:
body: Contains data to be published in Anypoint MQ
properties: A simple key-value pair of strings that are properties of the message
- Consume
The consume operation is used to consume a single message from any queue at any time of the flow using the acknowledgment strategy for your use case.
- Subscriber
The subscriber operation is used to listen for new messages and consume them as soon as they arrive at the destination.
- ACK
ACK operation provides a manual acknowledgement for the messages to the queue.
- NACK
NACK operation provides a manual no acknowledgement of the messages to the queue.
Acknowledgement Modes
In Anypoint MQ, there are three types of acknowledgementModes:
- Immediate
By default, it is set as IMMEDIATE which means that the message is acknowledged as soon as it is consumed from the queue and before it is processed by the Mule flow.
If an error occurs during this process, the message isn’t redelivered but instead, it throws an error ANYPOINT-MQ:ACKING. To manage the errors without losing the message, use DLQ to store the messages.
- Automatic
The AUTO mode is used to acknowledge a received message only if the execution of the flow is successful. If an error occurs during the execution, the message is not acknowledged and is sent back to the queue for redelivery.
- Manual
The MANUAL mode is used when the app logic is responsible for the acknowledgment of the message. With this configuration, a unique ackToken is generated for every message that is received. This ackToken can be used as an input for the ACK/NACK operations.
Practical Implementation – Use Case
An employee management system is there, we need to manage the data into two different systems.
So in this use case, one API will be created to read the client/employee data from a CSV file and store it in two different queues. Then that data will be fetched from the queues separately by using either Subscriber or Consume and then that data will be stored in the database.
Sample CSV:
id,firstname,contact,salary,designation
101,Frieda,9146791137,2868526,Marseille
102,Desirae,9334700621,2842950,Dublin
103,Tarra,9911636744,3495827,Riverside
104,Gusella,9490301855,3815923,Funafuti
105,Tarra,9723055450,4045760,Edmonton
106,Ottilie,9257336086,2043371,El Paso
107,Rhea,9907781269,4864561,Ambon
108,Gisela,9033599105,4737095,Amsterdam
109,Cam,9934544276,3640212,Yogyakarta (city)
110,Tonia,9214400081,3382217,Ponta Delgada
111,Tobe,9281274872,3099947,Ponta Delgada
112,Laurene,9867860920,3113101,Córdoba
113,Maisey,9162257400,2896334,Simferopol
114,Jany,9645911254,4170102,Lubumbashi
115,Meg,9694133935,3276687,Miami
116,Kial,9422167776,3854913,Yakutsk
117,Gusty,9294140215,2412079,Chihuahua
118,Lynea,9050643996,1343549,Gdańsk
119,Nananne,9074558421,2245403,Sofia
120,Penelopa,9758776479,3849714,Managua
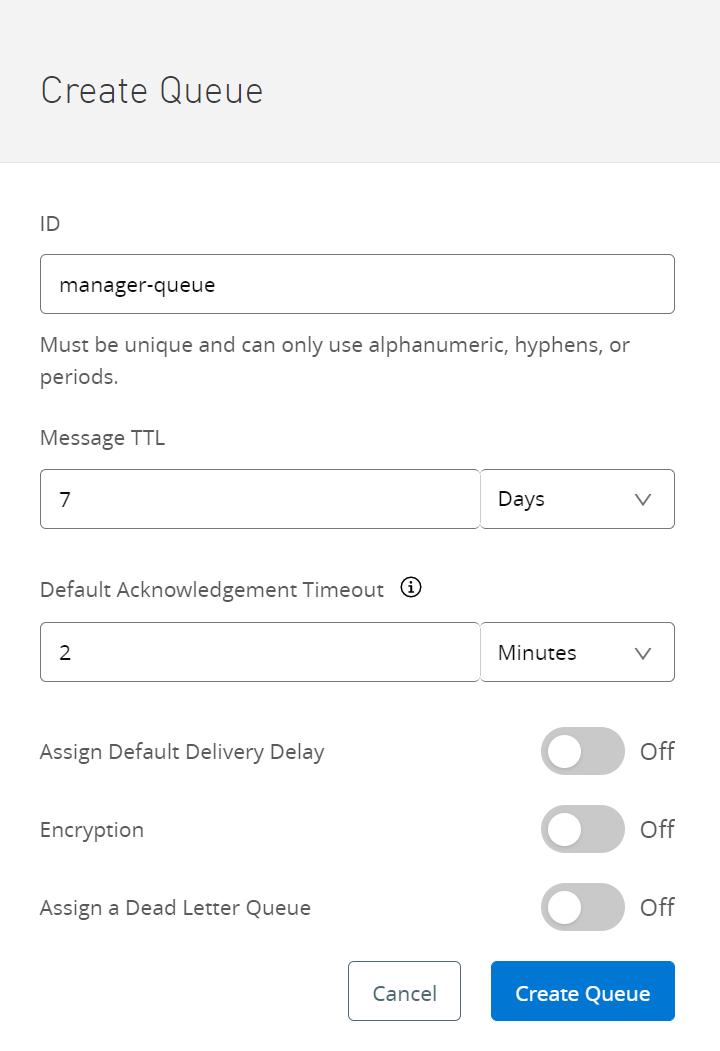
Step 1: Create queues
1. Go to Anypoint Platform. On the home page, click on MQ
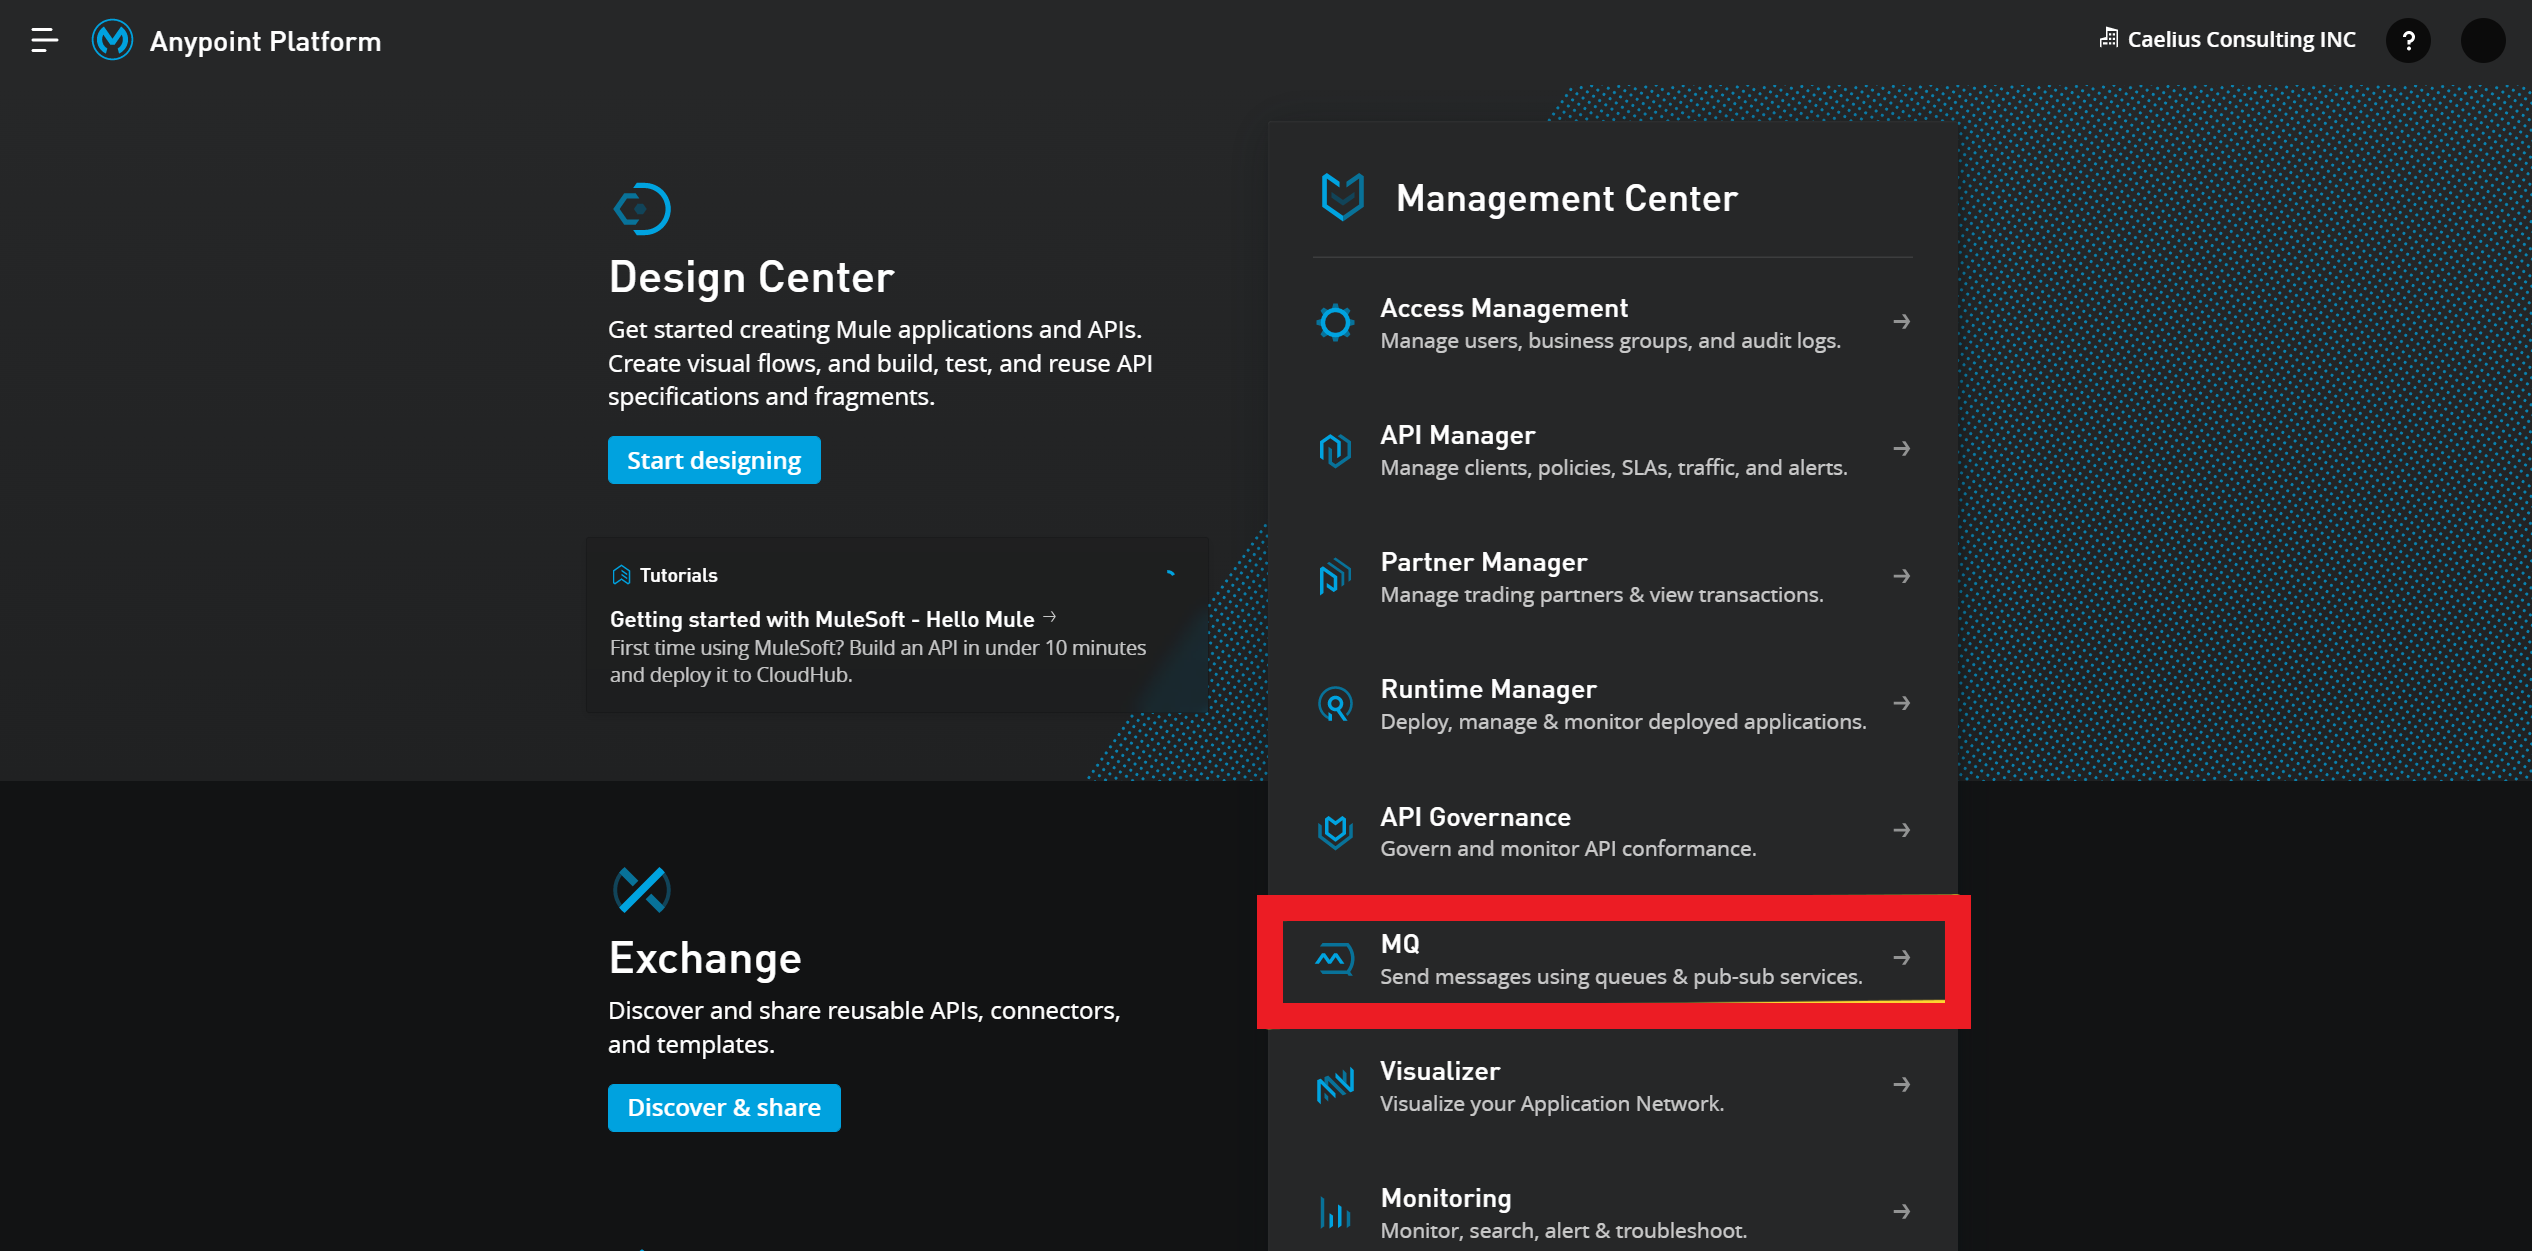
2. Click on Destinations in the left navigation pane and then click on the blue plus (+) icon in the top right corner

3. There you’ll get three options: Queue, Exchange, and FIFO Queue
4. Select Queue and fill in all the necessary information.
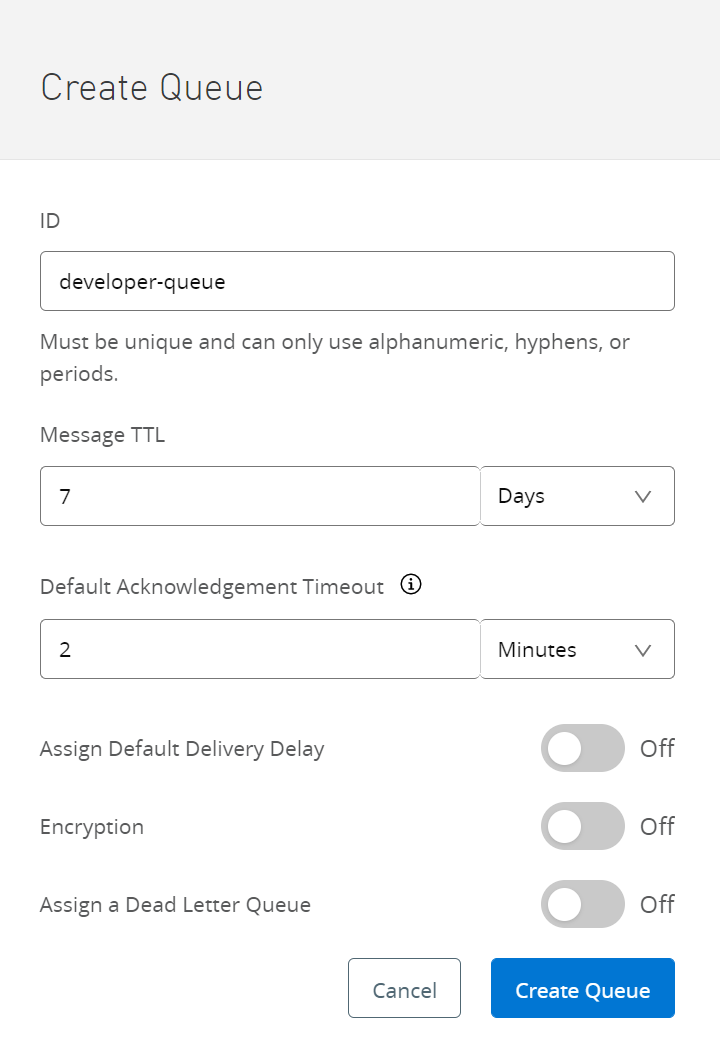
5. Similarly, create another queue for storing the rest of the data that won’t be stored in the first queue.
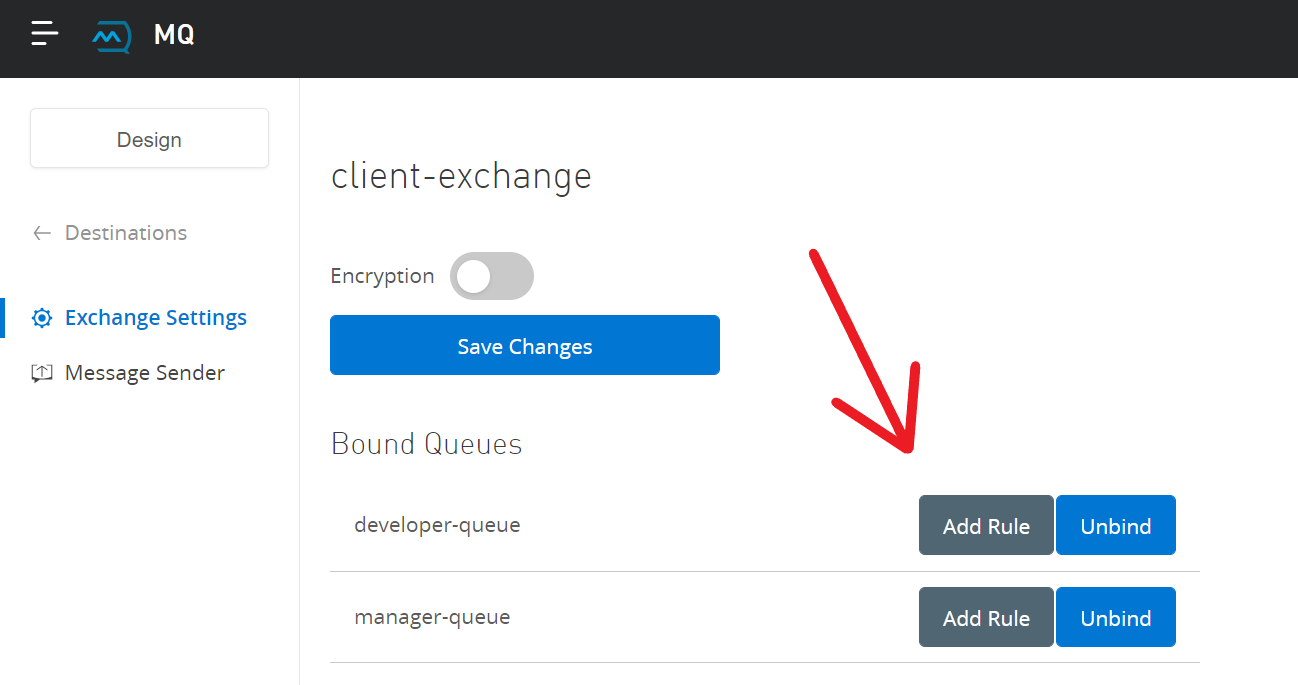
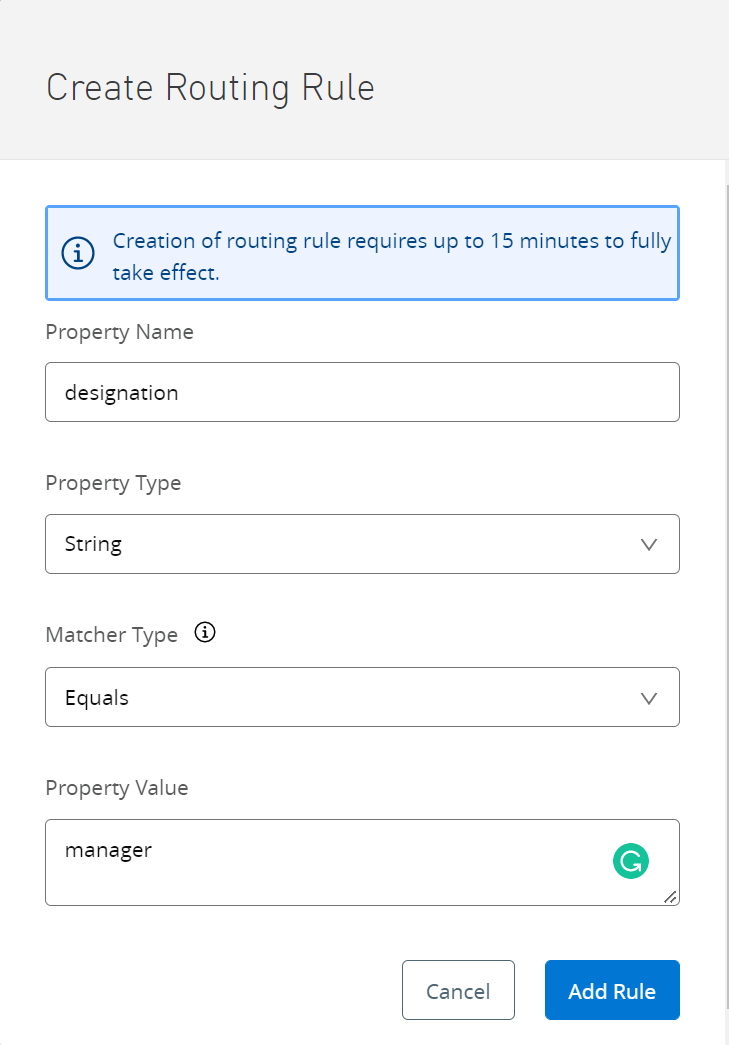
Step 2: Create an Exchange
1. Create an Exchange and bind both the queues to the exchange
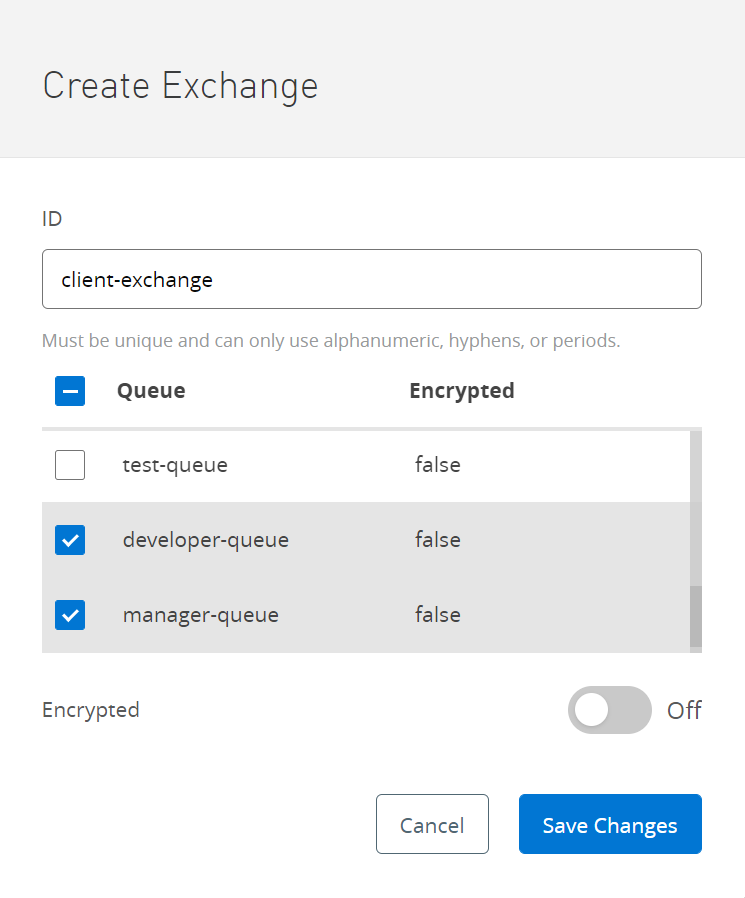
2. After it is created, open the exchange and routing rules to the queues to set rules for routing the data in the queues. You can do that by “Add Rule” and then fill all the necessary details.
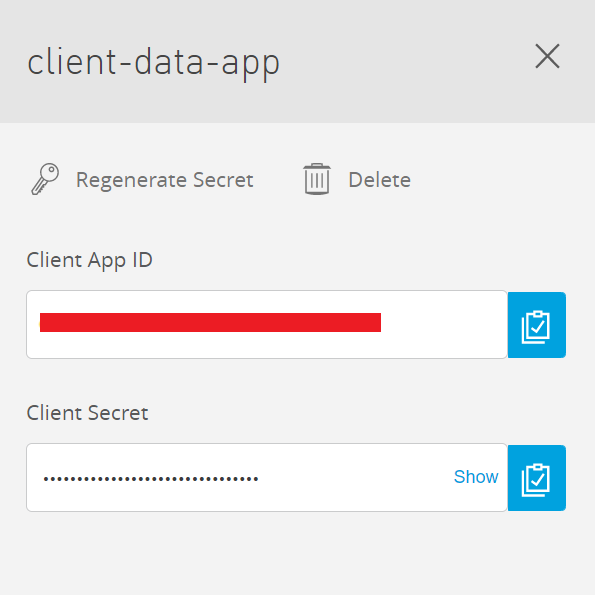
Step 3: Create a Client App
1. Go to Anypoint MQ and click on Client Apps in the navigation pane on the left side.
2. Click on the blue plus (+) icon and enter the name for your client app and click on Save Changes

3. A “Client App ID” and “Client Secret” will be generated that’ll be used to configure Anypoint MQ for Anypoint Studio
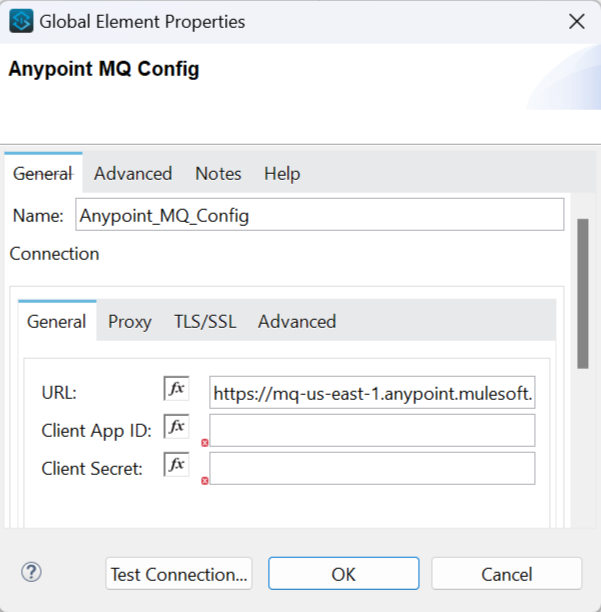
Step 4: Configure Anypoint MQ connector
- Create a sample Mule project in Anypoint Studio
- In the “Module Palette”, go to “Search in Exchange” and search “Anypoint MQ”. Add the module for the Anypoint MQ connector and in the “Global Elements”, add “Anypoint MQ Configuration”
- In the configuration, add the “Client App ID” and “Client Secret” that were generated in step 3 and click on ok
Step 5: Read the CSV file and add it to exchange
- Create a flow as shown below
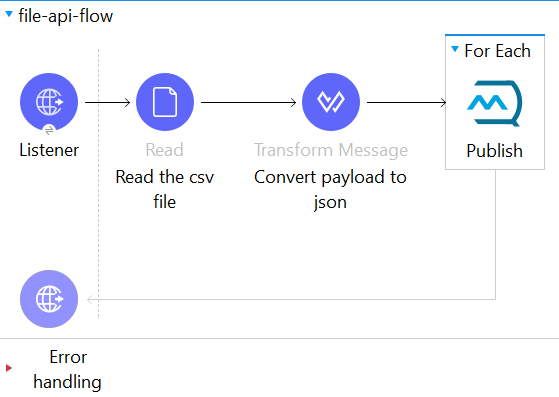
2. In the “Read” connector, select the path where the CSV file is located
3. Then convert the payload to JSON using “transform Message”
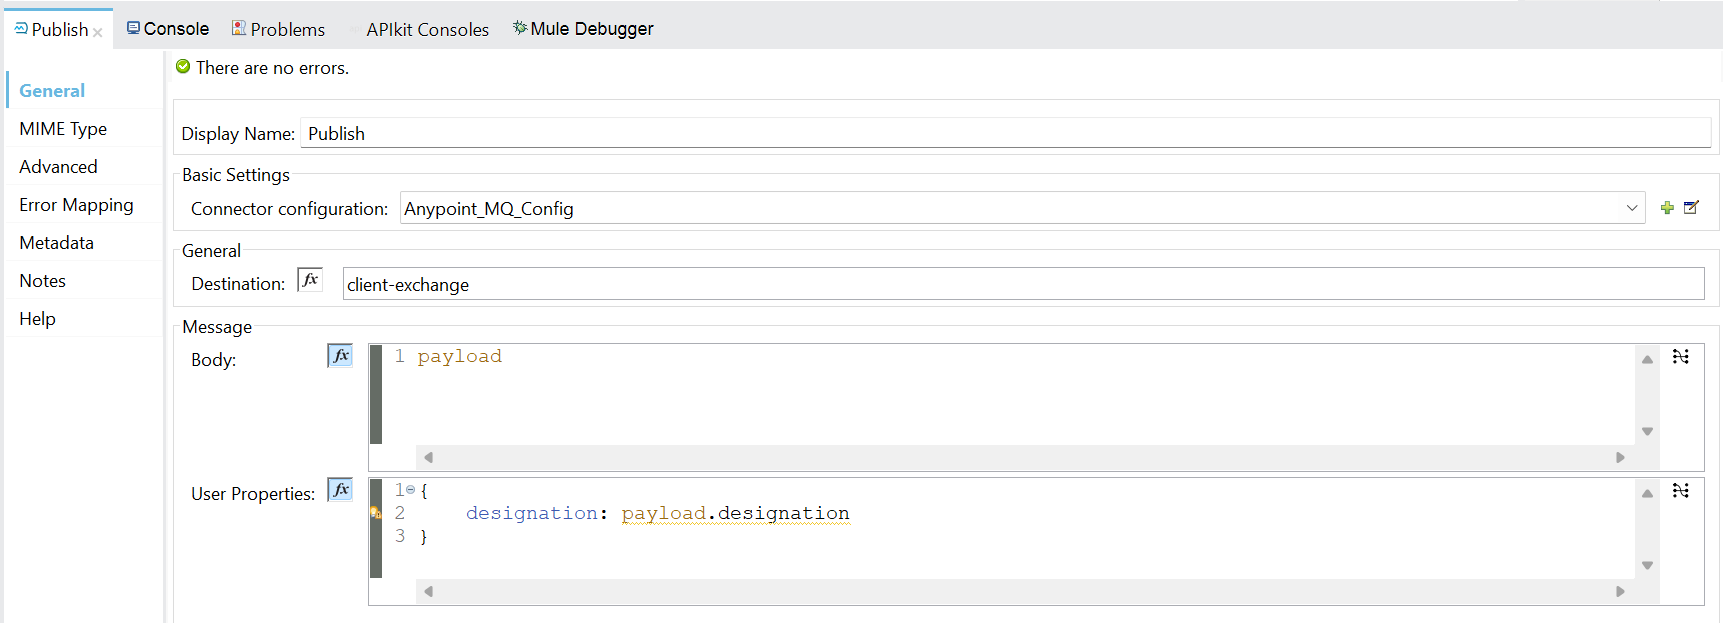
4. To send the message to the queue, use the “Publish” connector with the config given below.
5. Wrap the Publish in “For-each” to iterate through the multiple records and send the data to queues
6. Also, add the parameter in the “User Properties” that was defined in the exchange to separate the messages going to the queues
Step 6: Check messages in the exchange
- Go to Anypoint MQ in Anypoint Platform and open the queue you want to check for messages
- Select “Message Browser” from the navigation pane
- Select the number of messages to fetch and the time for which the queue will fetch messages
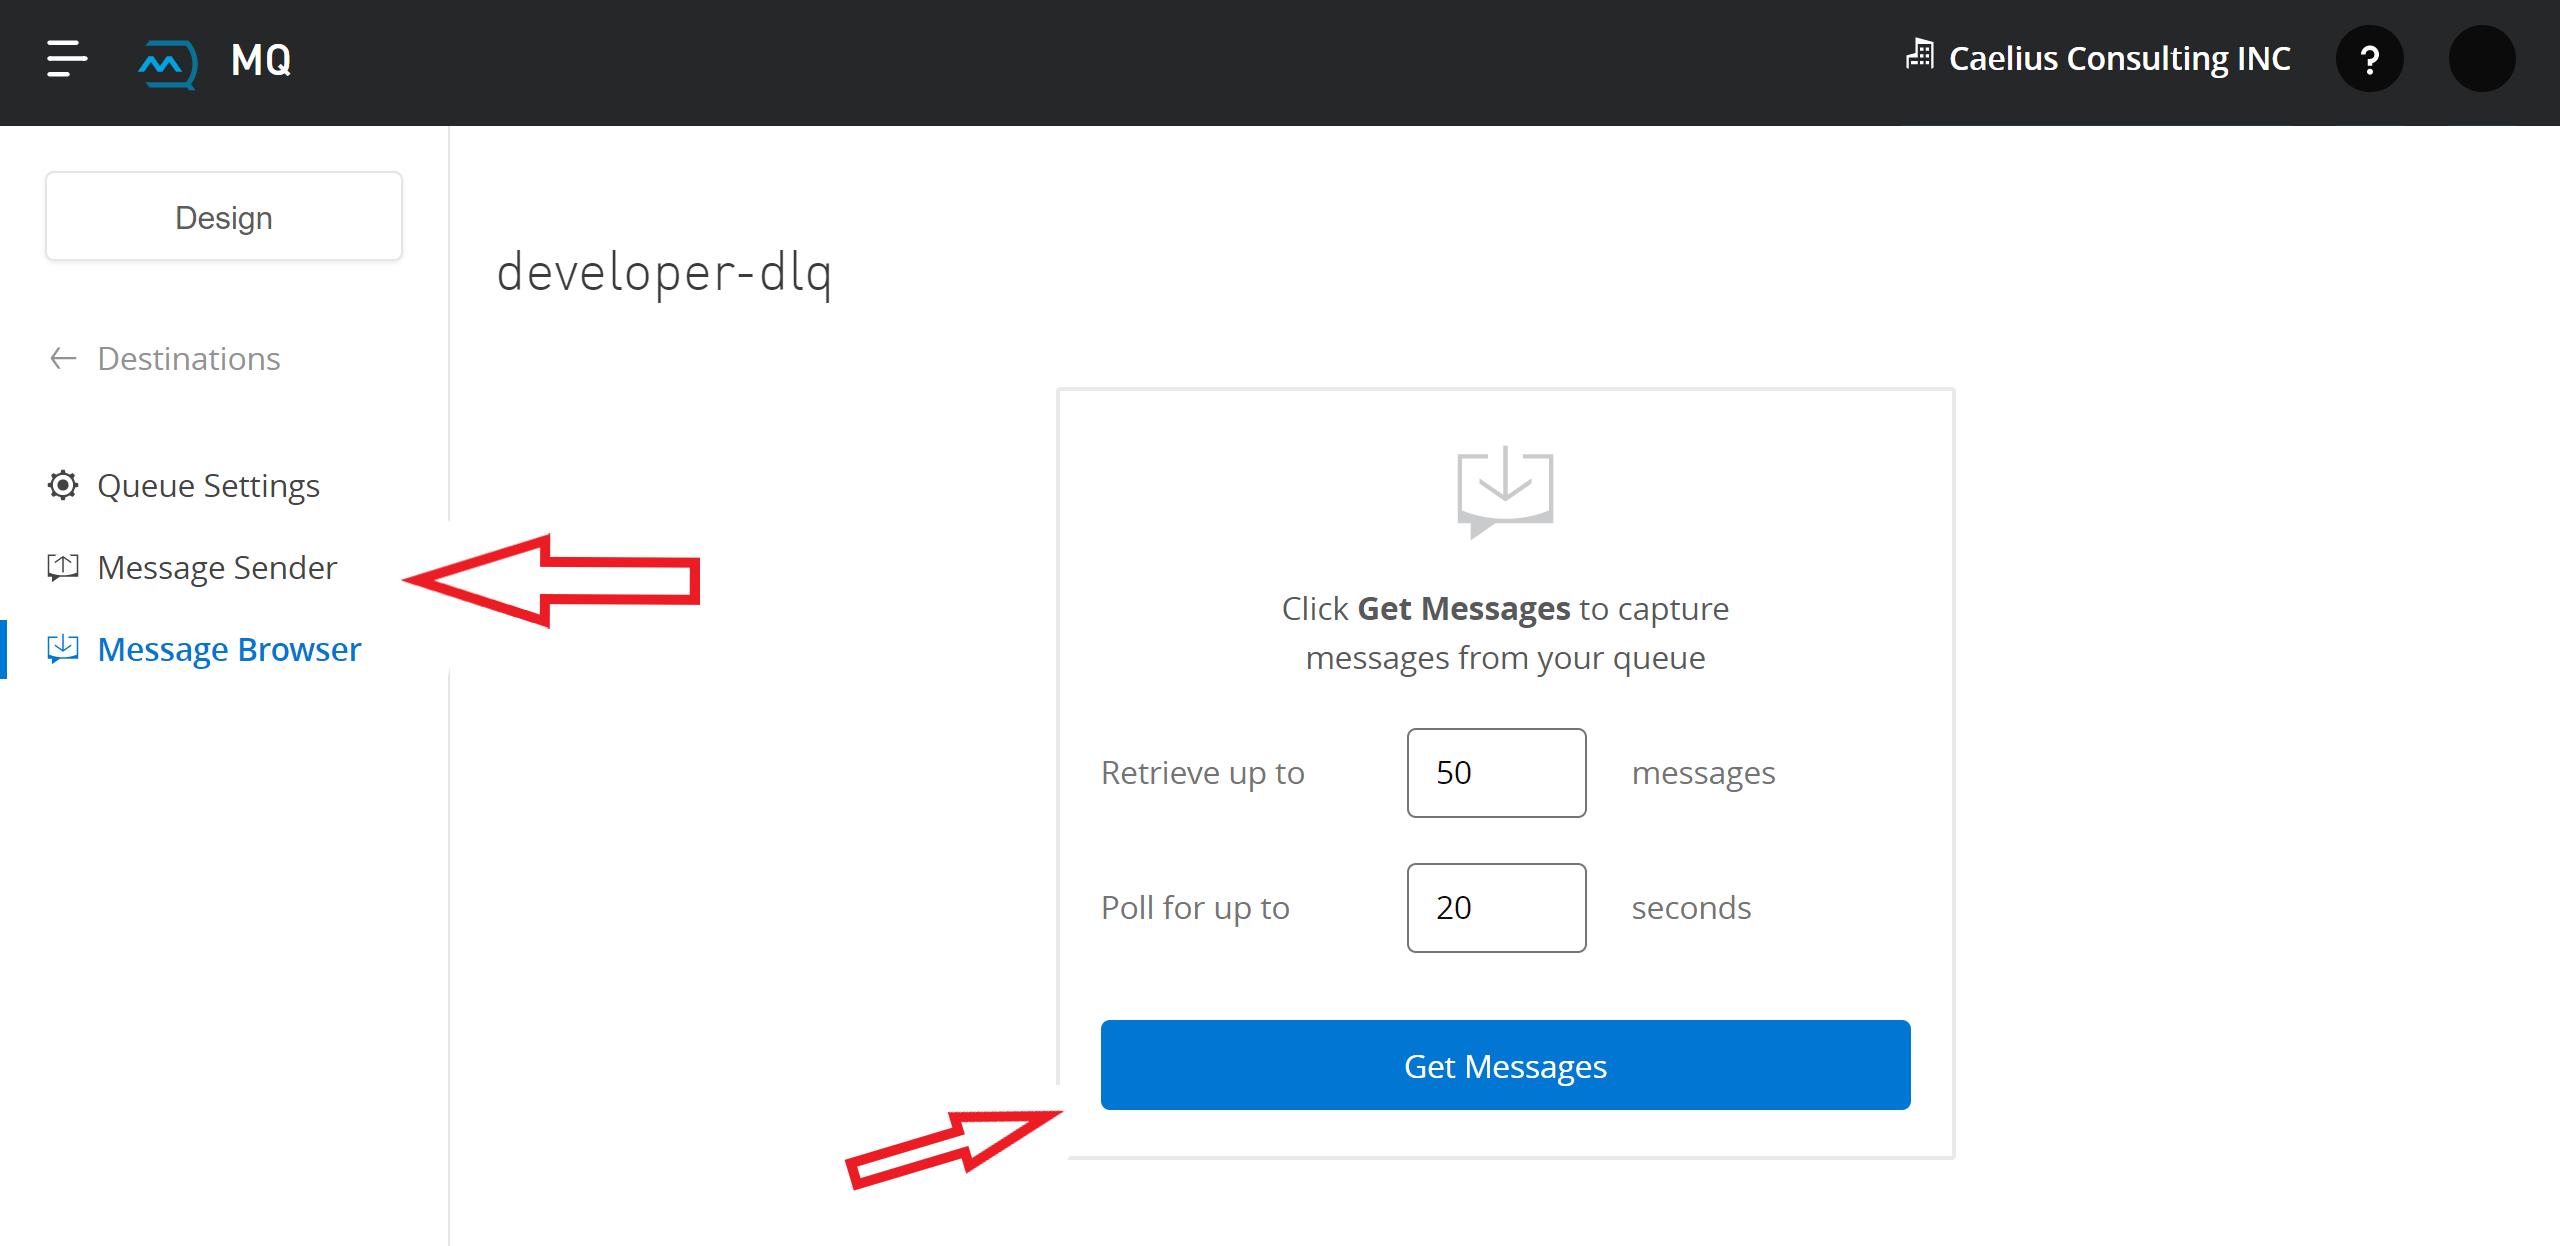
You’ll see that the messages are now in the queue waiting to be delivered
Step 7: Create DLQ
- Follow the same as creating a queue
- In the “Create Queue” panel, toggle the “Assign a Dead Letter Queue” option
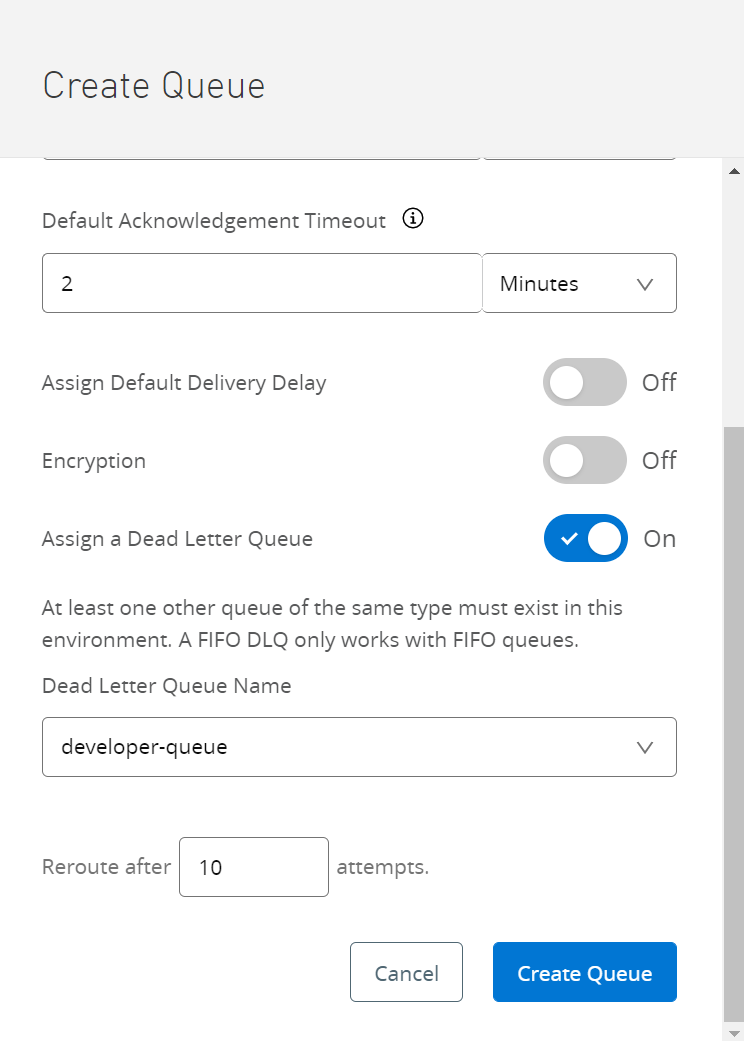
3. Select the queue for which you want to create a DLQ and click on create
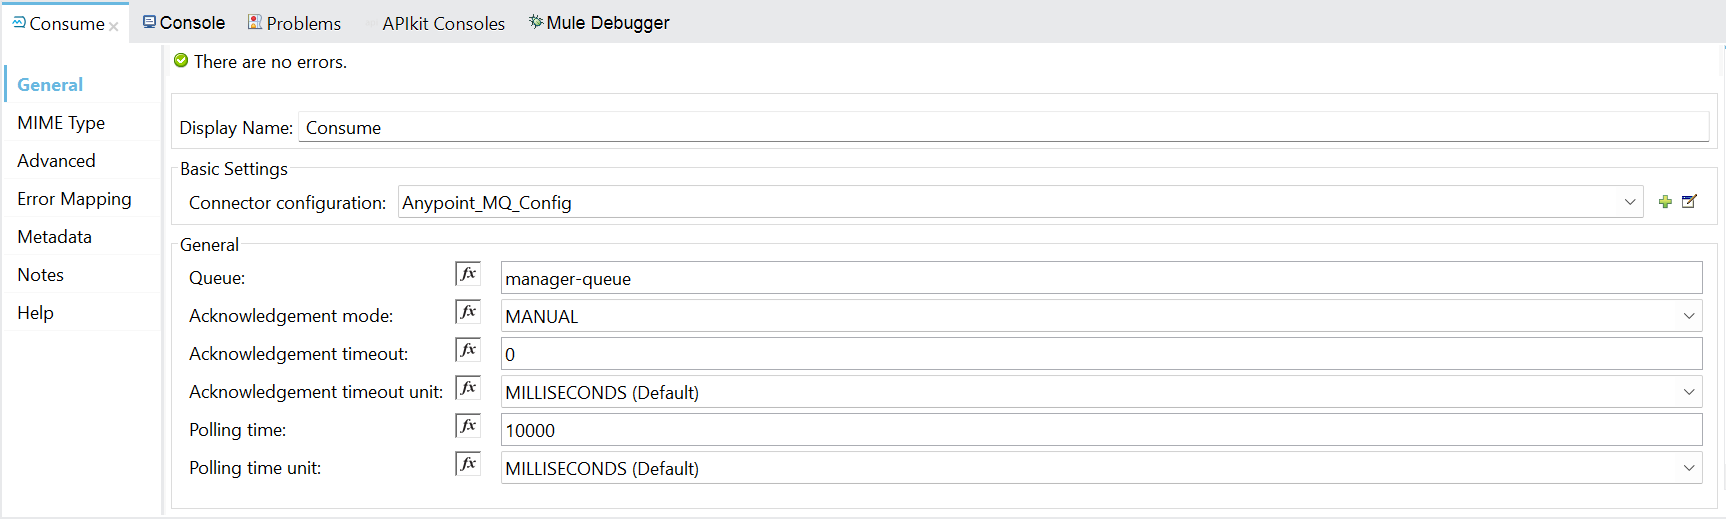
Step 8: Fetch messages from the queue and send it to the database (Using Consume)
- Create a flow as shown below
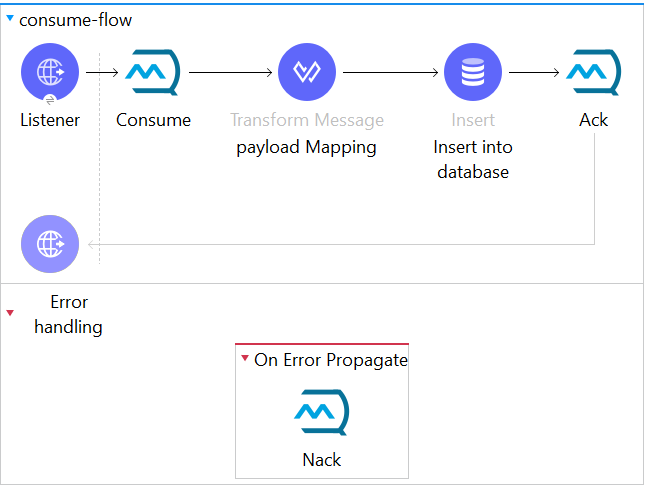
2. “Consume” is used to consume the message in the queue and after consumption the message weights for the flow to complete and then it is acknowledged.

3. Setting “Acknowledgement Mode” mode to MANUAL allows you to acknowledge messages at will
4. After the message is consumed, map it with the fields in the database
5. Using the “Insert” connector, the data is inserted into the database
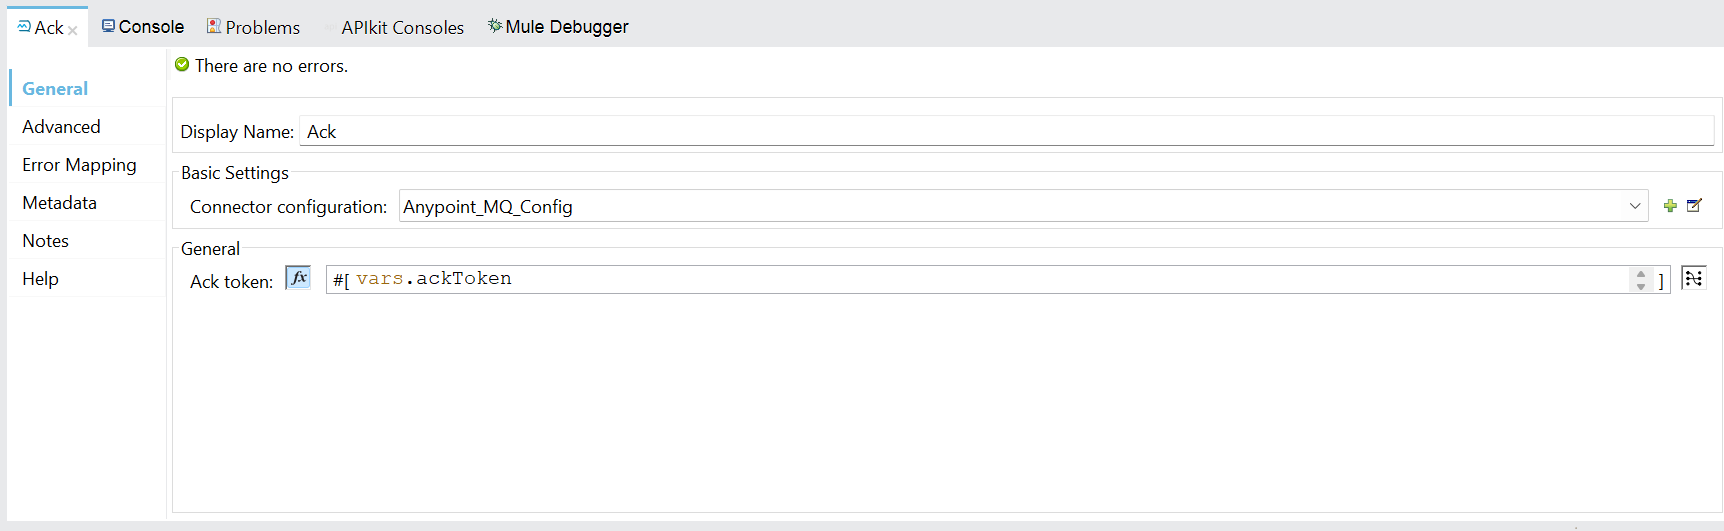
6. “ACK” connector acknowledges the messages if it is successfully inserted into the database and the message is deleted from the queue
If an error occurs while inserting the data in the database, it will go to error handling where the “NACK” connector will give negative acknowledgement to the message and the message will be sent to the DLQ.
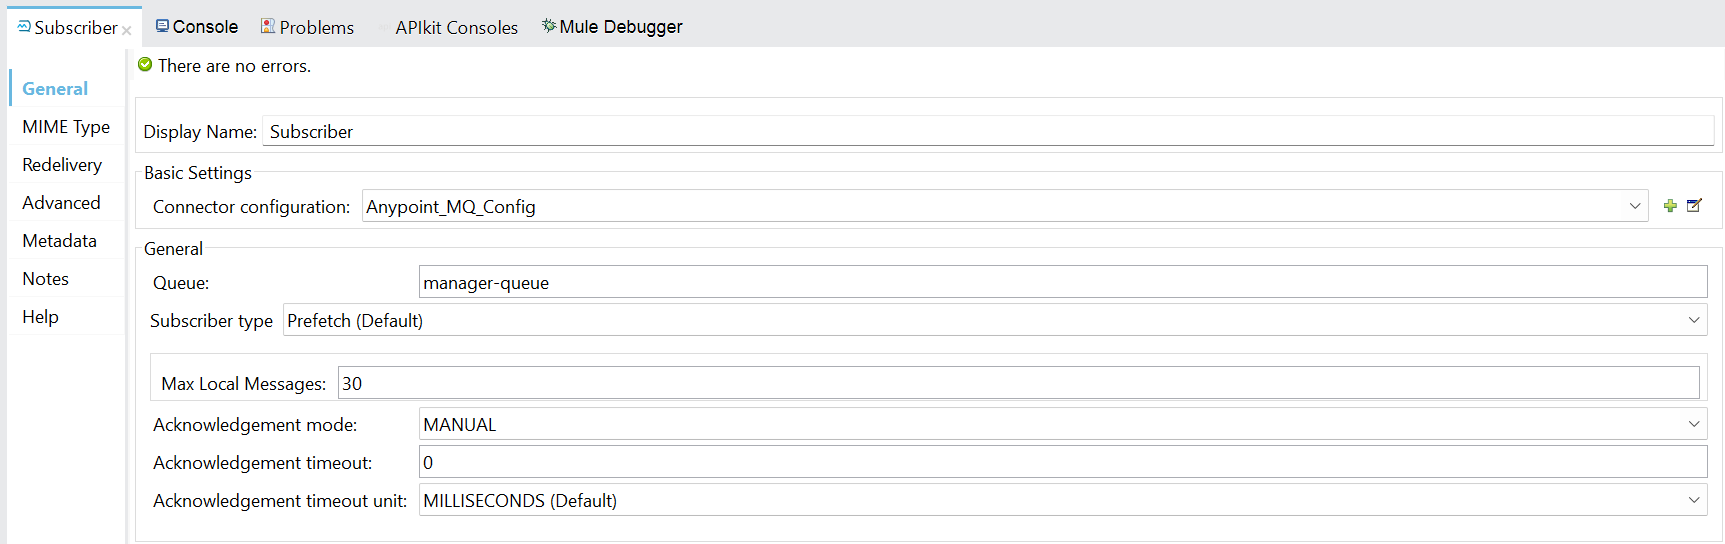
Step 8: Fetch messages from the queue and send it to the database (Using Subscriber)
- Create a flow as shown below

2. Adding “Subscriber” instead of listener automatically consumes the messages as soon as they arrive in the queue. Set the acknowledgement mode as MANUAL.
3. Map the payload with the fields in the database using “Transform Message”
4. Using the “Insert” connector, the data is inserted into the database
5. ACK and NACK are similar to the above step 8.
In conclusion, MuleSoft Anypoint MQ is a powerful messaging platform that provides seamless communication between applications, systems, and devices. It offers reliable and scalable message delivery, flexible message routing, and convenient integration.
Read more by Caelius Consulting’s Integration Team in Resource Centre.
Recent Blogs

Message Queue Driven Architecture in MuleSoft using Amazon SQS.
Whenever we are building complex systems using microservice architecture, we oft...…
Learn how MuleSoft & Salesforce helps businesses create incredible digital experiences. Speak with one of our consultants today
Let's Work Together